
Toilet Installation Sheet


6
ENGLISH
Water Level Adjustment
Depending on the manufacturing plant, you may have one of two of the following fill
valves:
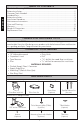
Type A Type B
Water Level
For Type A Fill Valve:
Refer to the water level (WL) setting marked
on the inner wall of the tank. Allow the wa-
ter to ll the tank. Turn the adjustment screw
clockwise in the (+) direction to increase the
water level height (see Illustration 1). Turn
the adjustment screw counter-clockwise in
the (-) direction to decrease the water level
height. Flush the toilet to verify the correct
water level. Adjust as necessary.
For Type B Fill Valve:
There are no water level adjustments. The
fill valve has been preset at the factory.
Top of
Overow
Tube
Water
Level
Ill. 1
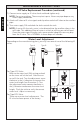
Fill Valve Replacement Procedure (continued)
7) Connect water supply to ll valve shank and hand-tighten only.
NO TE: Do not overtighten. These are plastic parts. Never use pipe dope on any
water supply connection.
8) Attach rell tube to ll valve nipple and clip other end of rell tube to the overow
pipe.
9) Turn water supply ON and check for leaks outside the tank.
NO TE: As water lls the tank, water is also directed into the overow tube via the
rell tube. This additional ow of water is critical to relling your toilet’s bowl.
Once the water stops filling the tank, some residual drops of water may drip
from the ll valve. This is NORMAL as these drops will subside.
Type C
MAINTENANCE INSTRUCTIONS