Installation and Owner’s Manual Manual de Instrucciones y del Propietario Manuel d’Installation et d’Utilisation 3-Way Diverter Valve Trim Acabado De Diversora Garniture De Dérivation Connelly™ TS221X TS221XW Warranty Registration and Inquiry For product warranty registration, TOTO U.S.A. Inc. recommends online warranty registration. Please visit our web site http://www.totousa.com. If you have questions regarding warranty policy or coverage, please contact TOTO U.S.A. Inc.
TABLE OF CONTENTS ENGLISH Thanks for Choosing TOTO! ������������������������������������������������������������������������������ 2 Before Installation ������������������������������������������������������������������������������������������������ 2 Common Tools Needed �������������������������������������������������������������������������������������� 2 Included Parts ������������������������������������������������������������������������������������������������������ 3 Installation Procedure ������
INCLUDED PARTS ENGLISH Check to make sure that all these parts were included in your packaging: Handle Assembly* Screw and Lock Washer Escutcheon* Threaded Extension Collar Set Screw and Hex Wrench Adapter * Actual product may vary in appearance depending on the model. INSTALLATION PROCEDURE 1. 2-1/2” [65mm] MIN. 2-1/2" [65mm] MIN. 3-3/4” MAX. 3-3/4" [95mm] [95mm] MAX. onfirm that the valve has been C installed properly.
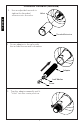
Installation Procedure (continued) 3. Use an adjustable wrench to tighten the threaded extension into the valve. Valve* ENGLISH Threaded Extension 4. Secure adapter to the valve with the included screw and lock washer. Adapter Lock Washer Screw 5. Turn the adapter manually until it “clicks” into the center position.
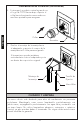
Installation Procedure (continued) Hold the escutcheon against the wall with the TOTO logo at the bottom. Tighten the collar onto the threaded extension with an wrench to secure. ENGLISH 6. Collar Escutcheon 7. Slide handle assembly onto the adapter, and tighten set screw to secure. If fine adjustment of handle position is desired, remove adapter, rotate one notch/tooth, and reinstall.
WARRANTY ENGLISH 1. TOTO® warrants its residential faucets and bathroom accessories (“Product) to be free from defects in materials and workmanship during normal use when properly installed and serviced, for the lifetime of the Product from date of purchase. This limited warranty is extended only to the ORIGINAL PURCHASER of the Product and is not transferable to any third party, including but not limited to any subsequent purchaser or owner of the Product.
ÍNDICE ¡GRACIAS POR ELEGIR A TOTO! La misión de TOTO es dar al mundo estilos de vida más saludables, higiénicos y cómodos. Diseñamos cada producto guiándonos por el principio del equilibrio entre forma y función. Felicitaciones por su elección. ANTES DE LA INSTALACIÓN Siga todos los códigos de plomería. Asegúrese que el suministro de agua esté cerrado. Lea estas instrucciones cuidadosamente para asegurar una instalación adecuada.
INCLUÍA PARTES Asegúrese de tener las siguientes partes que se indican abajo: Montaje de la manija Handle Assembly* Collar Collar Escutcheon* Escudete* ESPAÑOL Tornillo arandela Screw yand de seguridad Lock Washer Extensión Threaded Extension enroscada Adapter Adaptador Tornillo de and Fijación Set Screw Hex Wrench y Llave Hexagonal * El producto real puede variar en apariencia dependiendo del modelo. PROCEDIMIENTO DE INSTALACIÓN 1. Confirme que la válvula haya sido instalada adecuadamente.
Procedimiento de Instalación (continuación) 3. Utilice una llave ajustable para apretar la extensión enroscada a la válvula. Válvula Valve* 4. ESPAÑOL ExtensiónExtension enroscada Threaded Asegure el adaptador a la válvula con el tornillo y la arandela de seguridad incluidos. Adaptador Adapter Arandela de seguridad Lock Washer Tornillo Screw 5. Gire el adaptador manualmente que se haga “clic” en la posición central.
Procedimiento de Instalación (continuación) 6. Sostenga el escudete contra la pared con el logo de TOTO hacia abajo. Apriete el collar hacia la extensión enroscada con una llave ajustable para asegurar. ESPAÑOL Collar Escudete 7. Deslice el montaje de la manija hacia el adaptador, y apriete el cuerpo de la manija hacia el collar para asegurarlo. Si la manija no puede instalarse verticalmente: retire el adaptador y rote un diente de su posición original.
GARANTÍA 1. TOTO garantiza que sus grifos residenciales y accesorios de baño (“Producto”) no presentan defectos en sus materiales ni de fabricación durante su uso normal cuando son instalados y mantenidos adecuadamente, de por vida para el Producto a partir de la fecha de compra. Esta garantía limitada es válida solamente para el COMPRADOR ORIGINAL del Producto y no es transferible a una tercera persona, incluyendo, pero sin limitarse a, cualquier comprador o propietario subsecuente del Producto.
TABLE DES MATIÈRES Merci d’Avoir Choisi TOTO ������������������������������������������������������������������������������� 12 Avant l’installation ���������������������������������������������������������������������������������������������� 12 Outils communs nécessaires ����������������������������������������������������������������������������� 12 Pièces inclues ����������������������������������������������������������������������������������������������������� 13 Procédure d’installation �����������
PIÈCES INCLUSES Vérifiez que toutes les pièces sont inclues dans votre paquet: Ecusson* Escutcheon* Vis Screw et Rondelle and Lock Washer Extension Threaded Extension filetée Col Collar Tornillo de Adaptateur Adapter SetFijación Screw and et Hex Wrench Llave Allen * Le produit réel peut varier en apparence, selon le modèle. PROCÉDURE D’INSTALLATION 1. 2-1/2” [65mm] MIN. 2-1/2" [65mm] MIN. 3-3/4” [95mm] MAX. 3-3/4" [95mm] MAX. Vérifiez que la valve a été installée correctement.
Procédure d’Installation (suite) 3. Utiliser une clé à molette Valve* pour serrer l’extension filetée Valve dans la vanne. Extension filetée Threaded Extension 4. Fixer l’adaptateur à la valve avec la vis inclue et verrouiller la rondelle. FRANÇAIS Adaptateur Adapter Rondelle Lock Washer Vis Screw 5. Tournez l’adaptateur manuellement jusqu’à ce il “clics” dans la position du centre.
Procédure d’Installation (suite) 6. Tenez l’écusson contre le mur avec le logo TOTO au fond. Serrez le collier sur l’extension filetée avec une clé à molette pour sécuriser. Collar Glissez l’ensemble de la poignée sur l’adaptateur, et serrez le corps de la poignée sur col pour la sécuriser. FRANÇAIS 7. Ecusson Si la poignée ne peut être installée verticalement: retirez l’adaptateur et tournez d’une dent à partir de la position d’origine.
GARANTIE 1. TOTO® garantit ses robinets résidentiels et accessoires de bain (« Produit ») contre tout défaut de matériau et de fabrication pendant l’utilisation normale, lorsqu`ils sont correctement installés et maintenus pendant la durée de vie du produit à partir de la date d`achat du produit.
ROUGH-IN DIMENSIONS / DIMENSIONES PRELIMINARES / DIMENSIONS BRUTES TS221X 3-15/16” [100mm] Min: 2-1/2” [65mm] Min: 3-3/4” [95mm] Valve CL 4-15/16” [125mm] Finished Wall Surface 2-7/8” [73mm] TS221XW Min: 2-1/2” [65mm] Min: 3-3/4” [95mm] 3-15/16” [100mm] Valve CL 4-15/16” [125mm] Finished Wall Surface 2-7/8” [73mm] 17
TOTO® U.S.A., Inc. 1155 Southern Road, Morrow, Georgia 30260 Tel: 888-295-8134 Fax: 800-699-4889 www.totousa.com 0GU4228 Rev B Warranty Registration and Inquiry For product warranty registration, TOTO U.S.A. Inc. recommends online warranty registration. Please visit our web site http://www.totousa.com. If you have questions regarding warranty policy or coverage, please contact TOTO U.S.A. Inc.