
Installation Guide


4
ENGLISH
BEFORE INSTALLATION
Read these instructions thoroughly before beginning work.
Please leave these instructions for customers. These instructions contain mainte-
nance and warranty information.
If necessary, remove the existing toilet.
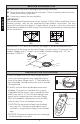
INSTALLATION PROCEDURE
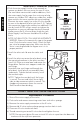
For your new TOTO toilet to fit correctly the rough-in, the distance between the
finished wall to the center of the closet flange, must be at least 12 inches for most
models. Models with 10” rough-in have model numbers ending with “.10”, for
example C744EF.10.”
Supply
Valve
Finished Wall
"RI"
C/L
Closet
Flange
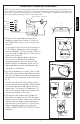
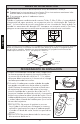
1) Clean any debris out of the closet flange and then
install new mounting bolts (not supplied) into the
slots of the closet flange (see Ill. 1). The head of the
bolt should be inserted into the slot with its threads
facing upward.
2) Carefully turn the toilet upside down onto some
padding. Firmly press a new bowl wax ring (not
supplied) onto the circular recess around the toilet
bowl’s horn (see Ill. 2). Turn the toilet upright and
gently lower into position over the closet flange.
With toilet properly aligned, press firmly on both
sides of toilet rim to set the bowl wax ring.
C AUTION: Do not move the bowl after the bowl
wax ring is set. Thread nuts and tighten evenly
until bowl is snug to closet flange. Install the bolt
caps.
C AUTION: Do not over-tighten the nuts as damage
to the china bowl may result.
Ill. 1
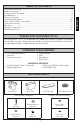
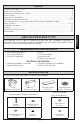
IMPORTANT!
Due to the powerful performance of our Cyclone, G-Max, E-Max and Power Gravity
flushing systems, they are not specified for back-to-back installations. The only
means of installing these toilets in a back-to-back situation is when the toilet drain
connections incorporate a WYE fitting. Please contact your builder or contractor prior
to this installation.
Double Combination WYE / 1/8 Bend
YES
Double Sanitary Tee / Sanitary Cross
NO
Wax Ring
Horn
Ill. 2