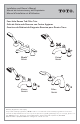
Installation and Owner’s Manual Manual de Instrucciones y del Propietario Manuel d’Installation et d’Utilisation Four-Hole Roman Tub Filler Trim Grifo de Bañera de Romano con Cuatro Agujeros Garniture de Robinet de Baignoire Romaine pour Quatre Trous Wyeth™ TB230S Vivian® TB220S1 Vivian® TB220S Silas® TB210S Warranty Registration and Inquiry For product warranty registration, TOTO U.S.A. Inc. recommends online warranty registration. Please visit our web site http://www.totousa.com.
TABLE OF CONTENTS ENGLISH Thank You for Choosing TOTO! ........................................................................ 2 Care And Cleaning .............................................................................................. 2 Warnings ............................................................................................................... 2 Before Installation ................................................................................................ 2 Included Parts ........
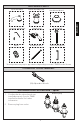
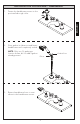
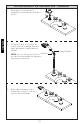
INCLUDED PARTS Handle Assembly* (2X) Set Screw and Hex Key Handshower* Handshower Hose Elbow Handshower Mount* Pop Up Rod* Tube for Pop Up Rod * Actual product may vary in appearance depending on model. TB220S model shown. COMMON TOOLS NEEDED (2X) Adjustable Wrench INSTALLATION PROCEDURE - Spout 1. Confirm that the valves have been installed properly. See the TBMV installation manual for further information. 2. Remove plug from outlet.
INSTALLATION PROCEDURE - Spout 3. Insert the tube for pop up rod inside the pre-installed diverter valve. Push firmly until fully seated. Take care not to damage the o-rings. ENGLISH 4. Orient spout assembly as shown and lower onto exposed portion of diverter valve. Use hex key to fasten spout to valve with provided set screw. Tighten as needed. 5. Pass the pop up rod through the opening in the spout and thread it into diverter valve to secure.
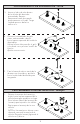
INSTALLATION PROCEDURE - Handshower Fasten the handshower mount to the pre-installed rough collar. 2. Place gasket in elbow nut and fasten handshower until completely sealed. ENGLISH 1. NOTE: Only one (1) gasket per location shown, do not add if gasket already present. 3. Gasket/Sieve Elbow Retract handshower hose to seat elbow in the handshower mount.
WARRANTY 1. TOTO® warrants its residential faucets and bathroom accessories (“Product") to be free from defects in materials and workmanship during normal use when properly installed and serviced, for the lifetime of the Product from date of purchase. This limited warranty is extended only to the ORIGINAL PURCHASER of the Product and is not transferable to any third party, including but not limited to any subsequent purchaser or owner of the Product.
ÍNDICE ¡Gracias Por Elegir TOTO! .................................................................................. 7 Cuidado y Limpieza ............................................................................................. 7 Advertencias......................................................................................................... 7 Antes de la Instalación ........................................................................................ 8 Partes Incluidas ...........................
PARTES INCLUIDAS Ensamblado de Grifo* Ensamblado de Manija* (2X) Tornillo e Fijación y Llave Allen ESPAÑOL Codo Barra de salto * Teleducha* Tubo de la barra de salto* Manguera de la Teleducha Varilla Conectora * Producto real puede variar en apariencia dependiendo del modelo. TB220S mostrado. HERRAMIENTAS NECESARIAS Llave Ajustable (2X) PROCEDIMIENTO DE INSTALACIÓN - Grifo 1. Confirme que las válvulas hayan estado instaladas correctamente.
3. Inserte el tubo de salto dentro de la válvula del desviador preinstalado. Empuje firmemente hasta que quede perfectamente colocado. Tenga cuidado para no dañar los anillos en o. 4. Oriente el ensamblado de grifo como está mostrado y bajelo hacia la parte expuesta de la válvula desviadora. Utilizar la llave allen para fije el grifo a la válvula con e provisto tornillo de fijación. Apriéte sea necesario. 5.
PROCEDIMIENTO DE INSTALACIÓN - Teleducha ESPAÑOL 1. Enrosque el el soporte de la teleducha el preinstalado collar de la válvula. 2. Coloque la junta en la tuerca del codo y sujete la regadera de mano hasta que quede completamente sellada. NOTA: Solo se incluye una (1) junta por ubicación mostrada. No agregue otra junta si ya hay una. 3. Retroceda la manguera de la teleducha y encaje el codo en el soporte de la teleducha.
GARANTÍA 1. TOTO® garantiza que sus grifos residenciales y accesorios de baño (“Producto”) no presentan defectos en sus materiales ni de fabricación durante su uso normal cuando son instalados y mantenidos adecuadamente, de por vida para el Producto a partir de la fecha de compra. Esta garantía limitada es válida solamente para el COMPRADOR ORIGINAL del Producto y no es transferible a una tercera persona, incluyendo, pero sin limitarse a, cualquier comprador o propietario subsecuente del Producto.
TABLE DES MATIÈRES Merci d’Avoir Choisi TOTO! ............................................................................. 12 Entretien et Nettoyage ..................................................................................... 12 Avertissements .................................................................................................. 12 Avant de Commencer ....................................................................................... 12 Pièces incluses ..............................
PIÈCES INCLUSES Assemblage de Poignée* (2X) Vis de Montage et Clé Allen Douchette* Coude Tuyau Tige escamotable* Tube de la tige escamotable* Tige de Connexion * Le produit réel peut varier en apparence en fonction du modèle. TB220S est montré. OUTILS NÉCESSAIRES Clé à molette (2X) PROCÉDURE D’INSTALLATION - Robinet 1. Confirmez que les valves ont été installées correctement. Voir le manuel d’installation TMBV pour plus d’informations. 2. Retirez le bouchon de la sortie.
PROCÉDURE D’INSTALLATION - Robinet 1. Insérez le tube de la tige escamotable à l’intérieur de la valve de l’inverseur pré-installée. Poussez fermement jusqu’à ce qu`il soit bien en place. Prenez soin de ne pas endommager les joints toriques. 4. Orientez l’assemblage de robinet comme indiqué et baissez-le sur la portion exposée de la valve. Utilisez la clé allen pour fixez le robinet avec le vis de montage fourni. Serrez avec au besoin. FRANÇAIS 5.
PROCÉDURE D’INSTALLATION - Douchette 1. Visser la tige escamotable sur le collar de la valve préinstallé. 2. Placez le joint d’étanchéité dans l’écrou du coude et fixez la douchette jusqu’à ce qu’elle soit complètement scellée. Le coude 3. FRANÇAIS REMARQUE : Un (1) joint uniquement par emplacement indiqué. Ne pas ajouter si un joint est déja en place.
GARANTIE 1. TOTO® garantit ses robinets résidentiels et accessoires de bain (« Produit ») contre tout défaut de matériau et de fabrication pendant l’utilisation normale, lorsqu`ils sont correctement installés et maintenus pendant la durée de vie du produit à partir de la date d`achat du produit.
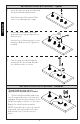
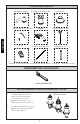
90 3-1/4" 83mm HOT OPEN 2-7/8" 72mm OPEN 90 2-13/16" 71mm COLD CLOSED 17 3-3/8" 85mm 8-3/4" 223mm 3-1/2" 89mm 12 50 TOTO logo 8-1/8" 206mm 5-1/8" 131mm 7-5/8" 194mm 10-1/4" 260mm ASME/CUPC 3-13/16" 96mm 10-5/8" 270mm TB230S 2-13/16" 71mm 3-5/8" 93mm CLOSED ROUGH-IN DIMENSIONS / DIMENSIONES PRELIMINARES / DIMENSIONS BRUTES
90 HOT 3-5/8" [92mm] CLOSED OPEN 2-13/16" [72mm] OPEN 2-5/16" [59mm] COLD 90 CLOSED 18 Hose Length 60" [1520mm] 60 22 7-7/8"[200mm] 6-13/16" [172mm] 4-13/16" [122mm] 10-7/16" 265mm TB220S 3-1/8" [80mm] 8-3/4" [223mm] 3-3/8" 85mm 10" [253mm] 8-11/16" [221mm] ROUGH-IN DIMENSIONS / DIMENSIONES PRELIMINARES / DIMENSIONS BRUTES
CLOSED HOT 3-5/8" [92mm] OPEN 2-13/16" [72mm] OPEN 2-5/16" [59mm] COLD 90 19 Hose Length 60" [1520mm] 3-1/8" [80mm] 8-3/4" [223mm] 3-3/8" [85mm] 60 22 10" [253mm] 7-7/8" [200mm] 6-13/16"[172mm] 8-11/16"[221mm] 4-13/16" [122mm] 10-7/16" [265mm] TB220S1 3-1/2" [89mm] 90 CLOSED ROUGH-IN DIMENSIONS / DIMENSIONES PRELIMINARES / DIMENSIONS BRUTES
HOT OPEN 3-3/16" [81mm] 90 20 2-11/16"[68mm] 2-11/16" [68mm] OPEN 90 COLD CLOSED Hose Length 60" [1520mm] 2-11/16" [68mm] 4-7/8"[124mm] 7-3/16" [183mm] 3-3/8"[86mm] 33 7-3/16" [183mm] 24 6" [152mm] 8-3/4"[223mm] 9-1/8"[232mm] 8-3/4"[223mm] 8-1/16" [204mm] TB210S 3-9/16" [90mm] CLOSED ROUGH-IN DIMENSIONS / DIMENSIONES PRELIMINARES / DIMENSIONS BRUTES
TOTO® U.S.A., Inc. 1155 Southern Road, Morrow, Georgia 30260 Tel: 888-295-8134 Fax: 800-699-4889 www.totousa.com 0GU4211 Rev B Warranty Registration and Inquiry For product warranty registration, TOTO U.S.A. Inc. recommends online warranty registration. Please visit our web site http://www.totousa.com. If you have questions regarding warranty policy or coverage, please contact TOTO U.S.A. Inc.