
Owners Manual: AUTOMATIC FAUCETS


7
ENGLISH
Connect the Spout to the Controller
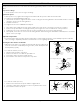
1. Insert the spout connecting hose into the fl exible
tube (if included) (see Ill. 1).
NO TE: If the spout connecting hose is too long, cut it
to the appropriate length, making sure the end is
square. Do not cut the hose more than 4 inches.
2. Push the spout connecting hose onto the outlet barb
of the controller and secure it with the hose clamp
(see Ill. 2). Make sure that the hose clamp is placed
fully against the controller.
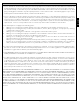
3. Connect the backup battery connector (white) to the
controller (see Ill. 3).
IMPORTANT!
Wait 2 minutes before proceeding to the next step to
allow the internal circuitry to stablize.
Make sure there are no obstructions between the
sensor and the basin, then connect the spout sensor
connector (green) to the controller (see Ill. 3 & 4).
4. Confi rm that the connections have been properly
made.
• The faucet will begin an automatic sensing range
adjustment immediately after the sensor connector
is plugged into the controller. During this process,
the red sensor light near the spout outlet will fl ash.
• Do not place your hands or other objects in front of
the sensor while the sensor light is fl ashing, as it will
interfere with the range adjustment process.
• If the sensor light continues to fl ash for more than
20 seconds, the spout direction will need to be
readjusted for proper operation. If adjustment is
necessary, you must do it within 10 minutes or the
adjustment process will end. To restart the process,
unplug the sensor connector for 10 seconds, then
reconnect it.
5. Double-check all connections, then reinstall the
controller cover, securing it with the screws.
WARNING: Draw the sensor cord from the bottom of the
controller while installing the controller cover to ensure
that the cord is not pinched.
To Install the Drain Assembly (Ryohan model only):
1. Install the main drain body, gasket, washer, and lock nut
in that order.
Install the Spout (continued)
Gasket
Lock Nut
Washer
Gasket
Main Drain Body
Cutting Length
Spout Connecting
Hose
90°
Flexible Tube
Spout Connecting
Hose
Spout
Connecting
Hose
Hose
Clamp
Clamp fl ush
with
controller
Ill. 1
Ill. 2
Ill. 3
Backup Battery
Connector (White)
Backup Battery
Connector (White)
Sensor
Connector
(Green)
Sensor
Connector
(Green)
Ill. 4
Sensor
Light
Sensor
SINGLE
SUPPLY
MODELS
THERMAL
MIXING
MODELS