
Installation Guide


INSTALLATION PROCEDURE — LARGE COVER
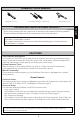
Hex wrench
Control stop
NOTE:
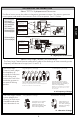
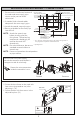
15. To set the Flush Valve for proper
operation, open the control stop
completely and activate the Flush
Valve several times.
16. In the case of excessive flow rate
because of high water pressure,
gradually adjust the control stop
clockwise (towards the closed position)
until there is suitable water flow into
the fixture.
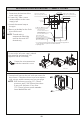
17. Tighten the front cover screws into
the base frame firmly with the hex
wrench.
Make sure no cord, wire or chain is
caught between the front cover and
base frame.
9
ENGLISH
The control stop should never be opened
to the point where the flow from the Flush
Valve exceeds the flow capability of the
fixture. In case of a valve failure, the water
must overflow from fixture.
The Flush Valves are preset for flush volume as
marked on the valve carton. The valve does not
require adjustment for variation in water pressure
within its operating range.
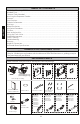
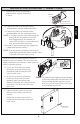
11. Connect the cables of the battery
and controller and set the battery
in place.
Connection cable
(button)
Connection cable
(sensor)
Battery
Controller
Connection cable
14. Ensure all pipe connections are completely
tightened to prevent leaking.
NOTE:
12. Connect the cables of infrared sensor
and controller with the connection
cable.
13. Connect the cables of manual button
and controller with the connection
cable.
NOTE:
It will take 5 minutes after connecting the
battery for the electronics to initialize.
After approximately 30 seconds, the
sensor LED will flash in 4 second intervals
until the initialization completes.
If for any reason it becomes necessary to
remove the control stop make sure the water
is shut off at the main supply valve.