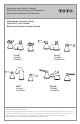
Installation and Owner’s Manual Manual de Instrucciones y del Propietario Manuel d’Installation et d’Utilisation Widespread Lavatory Faucet Grifo de 8” para Lavabo Robinet de Lavabo à Large Entraxe Vivian ® TL220DD TL220DD12 Silas® TL210DD TL210DD12 Vivian TL220DD1 Vivian® TL220DD1 TL220DD1(12) Wyeth™ TL230DD TL230DD12 Silas TL210DD Warranty Registration and Inquiry For product warranty registration, TOTO U.S.A. Inc. recommends online warranty registration. Please visit our web site http://www.
ENGLISH TABLE OF CONTENTS Thank You for Choosing TOTO! .........................................................................2 Care And Cleaning ...............................................................................................2 Warnings ................................................................................................................2 Common Tools Needed .......................................................................................3 Before Installation ..............
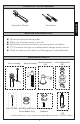
COMMON TOOLS NEEDED BEFORE INSTALLATION Observe all local plumbing codes. Make sure the water supply is shut off. Read these instructions carefully to ensure proper installation. TOTO reserves the right to update product design without notice.
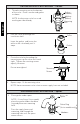
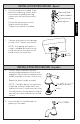
INSTALLATION PROCEDURE - Valves 1. Thread a mounting nut to the bottom of the valve. Place a washer and gasket as shown. Gasket Gasket (Rubber) (Rubber) Washer Washer (Metal) (Metal) NOTE: the hot water valve has a red marking on side of body. ENGLISH Mounting Mounting Nut Nut 2. Pass the valve up through the Gasket installation hole. Collar Collar Washer Insert the gasket and fasten the collar to the valve body until it Mounting stops. Nut 3.
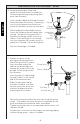
INSTALLATION PROCEDURE - Spout 6. Orient the spout as needed. From below the mounting surface, place the crescent shaped gasket and washer over the mounting stud as shown. MountingStud Stud Mounting Gasket Gasket(rubber) (Rubber) Washer Washer (metal) (Metal) Mounting Nut Mounting Nut 7. ENGLISH Fasten the mounting nut to the stud to secure the spout. Tighten with wrench as needed. Connect each hose to the side port of each valve. Tighten with wrench.
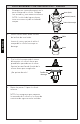
INSTALLATION PROCEDURE - Drain ENGLISH 10. Remove the plunger, flange and gasket (flat) from the drain assembly by unfastening the flange and pulling these parts from the drain. Insert the drain body up through the drain hole from below the lavatory. If necessary, turn the nut and push the washer and gasket (thick) down to allow for clearance.
WARRANTY 1. TOTO® warrants its residential faucets and bathroom accessories (“Product") to be free from defects in materials and workmanship during normal use when properly installed and serviced, for the lifetime of the Product from date of purchase. This limited warranty is extended only to the ORIGINAL PURCHASER of the Product and is not transferable to any third party, including but not limited to any subsequent purchaser or owner of the Product.
ÍNDICE ESPAÑOL ¡Gracias Por Elegir TOTO! ���������������������������������������������������������������������������������� Cuidado y Limpieza ��������������������������������������������������������������������������������������������� Advertencias ��������������������������������������������������������������������������������������������������������� Herramientas Necesarias ���������������������������������������������������������������������������������� Antes de la Instalación �����������������������
HERRAMIENTAS NECESARIAS Llave Ajustable Destornillador ANTES DE LA INSTALACIÓN Cumpla con todos los códigos locales de plomería. Asegúrese de que el suministro de agua esté cerrado. Lea estas instrucciones con atención para asegurar una instalación correcta. TOTO se reserva el derecho de actualizar el diseño del producto sin previo aviso.
PROCEDIMIENTO DE INSTALACIÓN - Válvulas 1. 2. Enrosque una tuerca de montaje en la parte inferior de la válvula. Coloque una arandela y junta como se muestra. NOTA: la válvula del agua caliente tiene una marca roja de un lado del cuerpo. Pase la válvula hacia arribaJunta a través (hule) del orificio de instalación. Junta (hule) Arandela (metal) Tuerca de montaje Collar Arandela (metal) ESPAÑOL Inserte la junta y apriete el collar al cuerpo de la válvula hasta que se Tuerca de montaje detenga. 3.
PROCEDIMIENTO DE INSTALACIÓN - Grifo 5. Coloque la junta debajo del surtidor. Surtidor* Spout* NOTA: Si está instalando un modelo Vivian, coloque la junta debajo del anillo de decoración y colóquelos sobre el orificio de montaje. Anillo de decoración (modelosBase vivian Ring (Vivian Models Onl únicamente) Pase las mangueas de suministro y la tachuela de montaje hasta que el surtidor quede apoyado. 6.
PROCEDIMIENTO DE INSTALACIÓN - Desagüe Barra elevación DraindeLift Rod* del drenaje * 9. Inserte la barra de elevación del drenaje a través de la abertura en el surtidor. ESPAÑOL 10. Retire el pistón, reborde y junta (plana) del montaje del drenaje aflojando el reborde y jalando estas partes del drenaje. Inserte el cuerpo del drenaje hacia arriba a través del orificio del drenaje desde la parte inferior del lavamanos.
GARANTÍA 1. TOTO® garantiza que sus grifos residenciales y accesorios de baño (“Producto”) no presentan defectos en sus materiales ni de fabricación durante su uso normal cuando son instalados y mantenidos adecuadamente, de por vida para el Producto a partir de la fecha de compra. Esta garantía limitada es válida solamente para el COMPRADOR ORIGINAL del Producto y no es transferible a una tercera persona, incluyendo, pero sin limitarse a, cualquier comprador o propietario subsecuente del Producto.
TABLE DES MATIÈRES Merci d’Avoir Choisi TOTO! ............................................................................. 14 Entretien et Nettoyage ..................................................................................... 14 Avertissements .................................................................................................. 14 Outils Nécessaires ............................................................................................. 15 Avant de Commencer .....................
OUTILS NÉCESSAIRES Tournevis Clé à molette AVANT DE COMMENCER Observez tous les codes locaux de plomberie. Assurez-vous que l’alimentation d’eau est coupée. Lisez ces instructions attentivement afin d’assurer une installation adéquate.
PROCÉDURE D’INSTALLATION- Valves 1. 2. Enfilez un écrou de montage au fond de la valve. Placez une rondelle et un joint comme indiqué. Joint (caoutchouc) Joint (caoutchouc) REMARQUE: Le robinet d’eau chaude a une marque rouge sur le côté du corps. Ecrous montage Ecrous de de montage La rondelle (métal) La rondelle (métal) Passez la valve dans le trou Joint (caoutchouc) d’installation. Col Col La rondelle (métal) Insérez le joint et fixez le col au corps de la valve jusqu’à ce qu’il s’arrête.
PROCÉDURE D’INSTALLATION - Bec Placez le joint sous le bec. Bec* Spout* REMARQUE: Si vous installez un modèle Vivian, placez le joint sous l’anneau de décor et placez le sur le trou de montage. Anneau de Décor Base Ring (Modèles Vivian (Vivian Models Only seulement) Passez les tuyaux d’approvisionnement et le goujon de montage à travers le trou de montage jusqu’à ce que le bec verseur se retrouve en position finale. 6. Joint Gasket Orientez le bec, au besoin.
PROCÉDURE D’INSTALLATION - Vidage 9. Tige deLift levage Drain Rod* du drain* Insérez la tige de levage du drain par l’ouverture du bec. 10. Retirez le piston, la bride et le joint (plat) de l’ensemble du drain en déserrant la bride et en tirant ces pièces du drain. Insérez le corps du drain à travers le trou du drain à partir du bas des toilettes. Si nécessaire, tournez l’écrou et poussez la rondelle et le joint (épais) vers le bas pour permettre le dégagement.
GARANTIE 1. TOTO® garantit ses robinets résidentiels et accessoires de bain (« Produit ») contre tout défaut de matériau et de fabrication pendant l’utilisation normale, lorsqu`ils sont correctement installés et maintenus pendant la durée de vie du produit à partir de la date d`achat du produit.
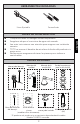
Open Close 90 HOT 1-3/8"-1-1/2" [35-39mm] Hole Open Open Close 1-1/4"-1-3/8"90[32-35mm] Hole 1-1/4"-1-3/8" [32-35mm] Hole 1/2" NPSM 1/2" NPSM COLD 1-3/8"-1-1/2" [35-39mm] Hole COLD 6-12" [152-305mm] 2-7/8" 73mm Open 6-12" [52-305mm] 2-7/8" 73mm 1-3/4" [44mm] Max.
3-3/16" 81mm Close 3-3/16" 81mm 4-5/16" 109mm Open 2-7/8" 73mm 90 1-3/4" [44mm] Max.
ROUGH-IN DIMENSIONS / DIMENSIONES PRELIMINARES / DIMENSIONS BRUTES TL210DD Close 90 90 3-1/16" 79mm 1/2" NPSM 4-5/16" 3-1/16" 109mm 79mm 2-1/8" 54mm 2-11/16" 69mm 2-11/16" 69mm 2-1/8" 54mm 4-5/16" 109mm 1/2" NPSM Open 6-12" [52-305mm] 6-12" [52-305mm] 2-1/8" 54mm Open HOT 2-1/8" 54mm HOT Open Open COLD COLD 90 90 Close 1-5/16”-1-7/16" [33-37mm] Mounting Hole 1-5/16”-1-7/16" [33-37mm] Mounting Hole 4-1/4" 108mm 7-5/8" 194mm 5-5/16" 135mm 28 7-5/8" 194mm 1-1/4" 32mm 5-5/16"
ROUGH-IN DIMENSIONS / DIMENSIONES PRELIMINARES / DIMENSIONS BRUTES TL230DD Close 2-13/16" 72mm 90 2-15/16" 75mm 2-1/4" 58mm 4-5/16" 109mm 1/2" NPSM Open 6-12" [152-305mm] 2-5/16" 59mm HOT Open COLD 90 Close 1-5/16-1-7/16" [33-37mm] Mounting Hole 2-7/16" 63mm 7-5/16" 186mm 5-5/16" 135mm 12 ( 6 Adjustability) 1-3/4" [44mm] Max.
TOTO U.S.A., Inc. 1155 Southern Road, Morrow, Georgia 30260 Tel: 888-295-8134 Fax: 800-699-4889 www.totousa.com 0GU4208 Rev G Warranty Registration and Inquiry For product warranty registration, TOTO U.S.A. Inc. recommends online warranty registration. Please visit our web site http://www.totousa.com. If you have questions regarding warranty policy or coverage, please contact TOTO U.S.A. Inc.