
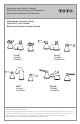
0GU4208 TL210DD TL220DD TL220DD1


6
ENGLISH
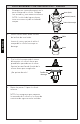
INSTALLATION PROCEDURE - Drain
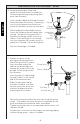
11. Prepare the pivot arm by
placing one bushing on each
side of the pivot ball as shown.
Insert the short end of the
rod into the drain body and
through the eyelet hole in the
plunger. Fasten the pivot ball
nut to secure.
Insert the drain lift rod through
the two (2) holes in the square
end of the connector rod.
Slide the connector rod up
the drain lift rod to a suitable
location so that the pivot arm
can pass through one of the
mounting holes as shown.
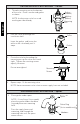
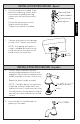
10. Remove the plunger, flange and
gasket (flat) from the drain assembly by
unfastening the flange and pulling these
parts from the drain.
Insert the drain body up through the drain
hole from below the lavatory. If necessary,
turn the nut and push the washer and
gasket (thick) down to allow for clearance.
While holding the drain body in place,
fasten the flange to the drain body from
the top. Ensure that the gasket (flat) is
between the flange and the lavatory as
shown. Once the flange is fully seated,
turn the nut below the lavatory up until a
good seal if formed. Do not overtighten!
Reinsert the plunger if needed.
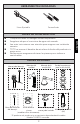
Secure the connector rod to the pivot arm using the spring
clamp. One end of the spring clamp will need to be on the
pivot arm before the connector rod is assembled.
Tighten the thumb screw in the connector rod to secure it to
the drain lift rod.
Conduct tests to ensure all the linkages are working properly
and no leaking occurs. Adjust if needed.
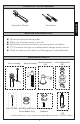
Bushings
Pivot Ball Nut
Thumb Screw
Drain Lift Rod
Connector Rod
Pivot Arm
Plunger
Flange
Tailpiece
Body
Nut
Washer
Gasket (thick)
Plunger
Flange
Gasket (flat)
Gasket (thick)
Washer
Nut
Tailpiece
Body