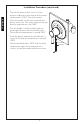
Installation and Owner’s Manual Manual de Instrucciones y del Propietario Manuel d’Installation et d’Utilisation ½” Thermostatic Trim ½” Acabado De Termostática ½” Garniture De Thermostatique Silas® Vivian® TS210T TS220T Wyeth™ TS230T Warranty Registration and Inquiry For product warranty registration, TOTO U.S.A. Inc. recommends online warranty registration. Please visit our web site http://www.totousa.com. If you have questions regarding warranty policy or coverage, please contact TOTO U.S.A. Inc.
TABLE OF CONTENTS ENGLISH Thanks for Choosing TOTO! .............................................................................. 2 Before Installation ............................................................................................... 2 Common Tools Needed ..................................................................................... 2 Included Parts ...................................................................................................... 3 Care & Cleaning ...............
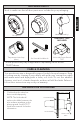
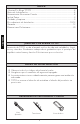
INCLUDED PARTS ENGLISH Check to make sure that all these parts were included in your packaging: Escutcheon Faceplate * Handle Assembly * REQUIRED - NOT INCLUDED Temperature Limit Stop (short) Set Screw & Hex Wrench Valve with Plaster Guard TSST * Actual product may vary in appearance depending on the model. TS220T shown. CARE & CLEANING Your new shower trim is designed for years of trouble-free performance.
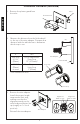
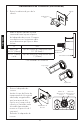
Installation Procedure (continued) 2. Remove the plaster guard from the valve. Valve Plaster Guard ENGLISH 3. Measure the distance from the finished wall to the top of the trim adapter. Compare that distance with the table below to determine which stop to use: X Use Less than 2-1/16” (53mm) Long Temperature Limit Stop 1.5” (37.5mm) * 2-1/16” (53mm) or more Short Temperature Limit Stop 1” (25mm) (X) Trim Adapter Finished Wall Long Stop * Pre-installed on valve Short Stop 4.
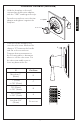
Installation Procedure (continued) 5. Hold the faceplate on the wall, centered around the trim adapter, with the “104F” markings at the top. Faceplate Faceplate ENGLISH Screw the escutcheon onto the trim adapter and tighten it against the faceplate. Escutcheon Escutcheon 6. Push the handle assembly fully onto the valve stem. Measure the distance “X” between the handle and flat on the escutcheon. X Compare that measurement to the following table to determine where to cut the valve stem.
Installation Procedure (continued) 7. Turn on the water and let it run for a few minutes. Adjust the valve stem until the water temperature is 104°F. Turn off the water. ENGLISH Place the handle on the valve stem with the button at the top. Turn on the water and check that the temperature is still 104°F. Turn the handle counterclockwise without pressing the button until the handle stops. Check that the temperature is around 108°F. Press the button and turn the handle until it stops.
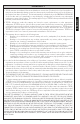
1. T OTO® warrants its residential faucets and bathroom accessories (“Product) to be free from defects in materials and workmanship during normal use when properly installed and serviced, for the lifetime of the Product from date of purchase. This limited warranty is extended only to the ORIGINAL PURCHASER of the Product and is not transferable to any third party, including but not limited to any subsequent purchaser or owner of the Product.
ÍNDICE ¡Gracias Por Elegir TOTO! ................................................................................. 8 Antes de la Instalación ........................................................................................ 8 Herramientas Necesarias Común ...................................................................... 8 Incluía Partes ........................................................................................................ 9 Cuidado y Limpieza.....................................
INCLUÍA PARTES Asegúrese que todas estas partes estén incluidas en su empacado: Escudete Montaje de la manija* NO ESTÁ INCLUIDO Tope del Límite de Temperatura Tornillo de Fijación y Llave Hexagonal Válvula con Cubierta de Yeso TSST * El producto real puede variar en apariencia dependiendo del modelo. CUIDADO Y LIMPIEZA Su nuevo recorte está diseñado para años de desempeño sin ningún problema.
Procedimiento de Instalación (continuación) 2. Retire la cubierta de yeso de la válvula. Válvula Cubierta de Yeso ESPAÑOL 3. Mida la distancia desde la pared terminada hasta la parte superior del adaptador de recorte. Compare esa distancia con la siguiente tabla para determinar qué tope se debe utilizar: X Uso (X) Menos de 2-1/16” (53mm) Tope del Límite de Temperatura Alto 1.5” (37.
Procedimiento de Instalación (continuación) 5. Sostenga la placa de recubrimiento en la pared, centrada alrededor del adaptador de recorte, con las marcas “104F” en la parte superior. Faceplate Placa 6. Empuje la montaje de la manija completamente hacia el vástago de la válvula. Mida la distancia “X” entre la perilla y la parte plana en el escudete. ESPAÑOL tornille el escudete hacia el adaptador A de recorte y apriételo contra la placa de recubrimiento.
Procedimiento de Instalación (continuación) 7. Encienda el agua y déjela correr por algunos minutos. Ajuste el vástago de la válvula hasta que la temperatura del agua sea de 104°F. Apague el agua. Coloque la manija en el vástago de la válvula con el botón en la parte superior. Encienda el agua y revise que la temperatura del agua siga siendo 104°F. ESPAÑOL Gire la manija en sentido contrario a las manecillas del reloj sin oprimir el botón hasta que la manija se detenga.
GARANTÍA 1. T OTO garantiza que sus grifos residenciales y accesorios de baño (“Producto”) no presentan defectos en sus materiales ni de fabricación durante su uso normal cuando son instalados y mantenidos adecuadamente, de por vida para el Producto a partir de la fecha de compra. Esta garantía limitada es válida solamente para el COMPRADOR ORIGINAL del Producto y no es transferible a una tercera persona, incluyendo, pero sin limitarse a, cualquier comprador o propietario subsecuente del Producto.
TABLE DES MATIÈRES Merci d’Avoir Choisi TOTO! ............................................................................. 14 Avant de Commencer ....................................................................................... 14 Outils Communs Nécessaires .......................................................................... 14 Pièces Incluses ................................................................................................... 15 Entretien et Nettoyage ............................
PIÈCES INCLUSES Vérifiez que toutes les pièces sont inclues dans votre paquet: Écusson Façade * Ensemble de la poignée* Limiteur de Température Vis de Fixation et Clé Hexagonale Valve avec Protège-Plâtre * TSST * Le produit réel pourrait varier en apparence en fonction du modèle. ENTRETIEN ET NETTOYAGE Votre nouvelle garniture est conçue pour plusieurs années d’opération sans problèmes.
Procédure d’Installation (suite) Valve 2. Enlevez le plâtre de protection de la valve. Plâtre de Protection 3. Mesurez la distance entre le mur fini et le dessus de la garniture de l’adaptateur. Comparez la distance avec la table qui suit en dessous pour déterminer lequel des limiteurs de température utiliser: (X) FRANÇAIS X Usage Moins de 2-1/16” (53mm) Limiteur de Température Long 1.5” (37.
Procédure d’Installation (suite) 5. Tenez la façade sur le mur, centré autour de la garniture de l’adaptateur, avec les marques “104F” au dessus. issez l’écusson sur la garniture V de l’adaptateur et serrez contre la façade. Écusson Escutcheon Escutcheon Poussez l’ensemble de la poignée entièrement sur la tige de la valve. Mesurez la distance “X” entre la poignée et la surface de l’écusson. X Comparez cette mesure à la table suivante pour déterminer où couper la tige de la valve.
Procédure d’Installation (suite) 7. Ouvrez le robinet d’eau et laissez couler pendant quelques minutes. Ajustez la tige de la valve jusqu’à ce que la température de l’eau est à 104°F. Fermez le robinet d’eau. Placez la poignée sur la tige de la valve avec le bouton en haut. Allumez l’eau et vérifiez que la température est toujours à 104°F. Tournez la poignée dans le sens antihoraire sans presser le bouton, jusqu’à ce que la poignée s’arrête. Vérifiez que la température est à 108°F.
GARANTIE 1. TOTO® garantit ses robinets résidentiels et accessoires de bain (« Produit ») contre tout défaut de matériau et de fabrication pendant l’utilisation normale, lorsqu`ils sont correctement installés et maintenus pendant la durée de vie du produit à partir de la date d`achat du produit.
ROUGH-IN DIMENSIONS / DIMENSIONES PRELIMINARES / DIMENSIONS BRUTES TS220T Min: 2-1/2" [65mm] Max: 3-3/4" [95mm] 6-1/2" 165mm Valve CL 7" 178mm 3-9/16" 90mm Finished Wall Surface TS210T Valve CL Min: 2-1/2" [ 65mm] Max: 3-3/4" [95mm] 6-1/2" 165mm 6-5/8" 169mm Finished Wall Surface 3-9/16" 91mm 20
ROUGH-IN DIMENSIONS / DIMENSIONES PRELIMINARES / DIMENSIONS BRUTES TS230T Ø6-1/2” [165mm] Min: 2-1/2” [65mm] Max: 3-3/4” [95mm] 3-3/4” [95mm] 21 Valve CL Finished Wall Surface
TOTO® U.S.A., Inc. 1155 Southern Road, Morrow, Georgia 30260 Tel: 888-295-8134 Fax: 800-699-4889 www.totousa.com 0GU4207 Rev D Warranty Registration and Inquiry For product warranty registration, TOTO U.S.A. Inc. recommends online warranty registration. Please visit our web site http://www.totousa.com. If you have questions regarding warranty policy or coverage, please contact TOTO U.S.A. Inc.