
Installation


4
ENGLISH
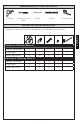
INSTALLATION PROCEDURE
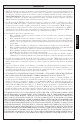
1. Unscrew the set screw at the base of the product. Remove the mounting
bracket.
2. Using the mounting bracket as a template, mark the location of the
mounting screws with a pencil. For towel bars, please use attached
template for locations.
3. Choose your installation method.
NOTE: These accessories work best if secured to a wall stud or stringer
using the supplied screws.
For Drywall:
• Drill a hole at each marked location.
• Insert anchors until they are flush with the face of the finished wall.
• Place the mounting bracket over the drywall anchors, insert the screws
and tighten to secure them.
For Ceramic Tile:
• Drill 1/4” pilot holes a minimum of 1-1/4” deep at each marked location.
• Insert anchors until they are flush with the face of the finished wall.
• Place the mounting bracket over the anchors, insert the screws and
tighten to secure them.
NOTE: If the wall stud is drilled, use a screw instead of an anchor for
mounting.
For Wooden Stud or Stringer:
• Drill 1/8” pilot holes.
• Place the mounting bracket, then insert the screw into the pilot hole and
tighten to secure it.
4. Place the product over the mounting bracket and tighten the set
screw(s) with the hex wrench.
Mounting
Bracket
Set
Screw
Screw
Product