
User's Manual
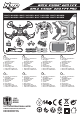

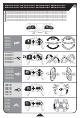

1.5V AA 1.5V AA
1.5V AA1.5V AA
1.5V AA
1.5V AA
1.5V AA
1.5V AA
MICRO USB
2
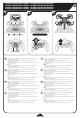
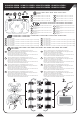
BATTERY INSTALLATION • BATTERY INSTALLATION • BATTERY INSTALLATION •
BATTERY INSTALLATION • BATTERY INSTALLATION • BATTERY INSTALLATION •
BATTERY INSTALLATION • BATTERY INSTALLATION
1
2
FR
DE
ES
IT
PT
PL
NL
GB
FR
DE
ES
IT
PT
PL
NL
GB
FR
DE
ES
IT
PT
PL
NL
GB
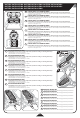
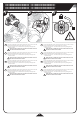
REMOVING THE BATTERY
• Slide the battery release tab to the left to disengage the battery from the drone.
REMOVING THE BATTERY
• Slide the battery release tab to the left to disengage the battery from the drone.
REMOVING THE BATTERY
• Slide the battery release tab to the left to disengage the battery from the drone.
REMOVING THE BATTERY
• Slide the battery release tab to the left to disengage the battery from the drone.
REMOVING THE BATTERY
• Slide the battery release tab to the left to disengage the battery from the drone.
REMOVING THE BATTERY
• Slide the battery release tab to the left to disengage the battery from the drone.
REMOVING THE BATTERY
• Slide the battery release tab to the left to disengage the battery from the drone.
REMOVING THE BATTERY
• Slide the battery release tab to the left to disengage the battery from the drone.
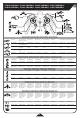
CONTROLLER & LCD SCREEN BATTERIES
Caution! Make sure they are in the o position (O) before inserting or removing the battery.
• Loosen the screws on the back of the controller and LCD screen with a Phillips screwdriver and insert batteries as shown.
• Replace door and tighten screws.
CONTROLLER & LCD SCREEN BATTERIES
Caution! Make sure they are in the o position (O) before inserting or removing the battery.
• Loosen the screws on the back of the controller and LCD screen with a Phillips screwdriver and insert batteries as shown.
• Replace door and tighten screws.
CONTROLLER & LCD SCREEN BATTERIES
Caution! Make sure they are in the o position (O) before inserting or removing the battery.
• Loosen the screws on the back of the controller and LCD screen with a Phillips screwdriver and insert batteries as shown.
• Replace door and tighten screws.
CONTROLLER & LCD SCREEN BATTERIES
Caution! Make sure they are in the o position (O) before inserting or removing the battery.
• Loosen the screws on the back of the controller and LCD screen with a Phillips screwdriver and insert batteries as shown.
• Replace door and tighten screws.
CONTROLLER & LCD SCREEN BATTERIES
Caution! Make sure they are in the o position (O) before inserting or removing the battery.
• Loosen the screws on the back of the controller and LCD screen with a Phillips screwdriver and insert batteries as shown.
• Replace door and tighten screws.
CONTROLLER & LCD SCREEN BATTERIES
Caution! Make sure they are in the o position (O) before inserting or removing the battery.
• Loosen the screws on the back of the controller and LCD screen with a Phillips screwdriver and insert batteries as shown.
• Replace door and tighten screws.
CONTROLLER & LCD SCREEN BATTERIES
Caution! Make sure they are in the o position (O) before inserting or removing the battery.
• Loosen the screws on the back of the controller and LCD screen with a Phillips screwdriver and insert batteries as shown.
• Replace door and tighten screws.
CONTROLLER & LCD SCREEN BATTERIES
Caution! Make sure they are in the o position (O) before inserting or removing the battery.
• Loosen the screws on the back of the controller and LCD screen with a Phillips screwdriver and insert batteries as shown.
• Replace door and tighten screws.
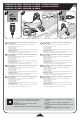
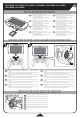
INSTALLING DRONE BATTERY
Caution! Make sure the drone is in the o position (O) before inserting or removing the battery.
1. Slide the battery in to place, prong end first.
2. Push downward on the back of the battery to connect.
INSTALLING DRONE BATTERY
Caution! Make sure the drone is in the o position (O) before inserting or removing the battery.
1. Slide the battery in to place, prong end first.
2. Push downward on the back of the battery to connect.
INSTALLING DRONE BATTERY
Caution! Make sure the drone is in the o position (O) before inserting or removing the battery.
1. Slide the battery in to place, prong end first.
2. Push downward on the back of the battery to connect.
INSTALLING DRONE BATTERY
Caution! Make sure the drone is in the o position (O) before inserting or removing the battery.
1. Slide the battery in to place, prong end first.
2. Push downward on the back of the battery to connect.
INSTALLING DRONE BATTERY
Caution! Make sure the drone is in the o position (O) before inserting or removing the battery.
1. Slide the battery in to place, prong end first.
2. Push downward on the back of the battery to connect.
INSTALLING DRONE BATTERY
Caution! Make sure the drone is in the o position (O) before inserting or removing the battery.
1. Slide the battery in to place, prong end first.
2. Push downward on the back of the battery to connect.
INSTALLING DRONE BATTERY
Caution! Make sure the drone is in the o position (O) before inserting or removing the battery.
1. Slide the battery in to place, prong end first.
2. Push downward on the back of the battery to connect.
INSTALLING DRONE BATTERY
Caution! Make sure the drone is in the o position (O) before inserting or removing the battery.
1. Slide the battery in to place, prong end first.
2. Push downward on the back of the battery to connect.