
Instruction manual


34
English Français
Nederlands Italiano
1-1.5
11
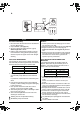
BA
C
Mending
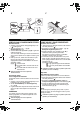
1. Be sure that the declutch knob in the handwheel is
into the ( ) direction.
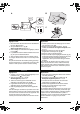
2. Set your machine as... (fig A)
Stitch length dial between 1-1.5
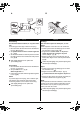
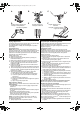
3. Place a patch over the worn part. Sew along the
edge of the right side of the patch.
4. Trim the worn part along the seam on the wrong
side of fabric. (fig B)
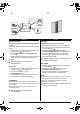
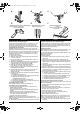
Mending a rip (fig C)
Set the machine in the same way as for mending.
Sew the edges of tear together first. Then sew one
more seam on each side (right side and wrong side) of
the fabric.
A piece of fabric can be placed underneath to
reinforce the rip.
Racommodage
1. Vérifier que le bouton de débrayage sur le volant est
enclenché vers ( ).
2.
Régler la machine comme indiqué...
(fig.
A
)
Cadran de sélecteur de longueur du point entre
1 et 1,5
3. Placez la pièce de racommodage sur le tissu support.
Coudre en suivant le bord du côté droit de la pièce de
racommodage.
4. Couper légèrement le long de la couture en
retournant le tissu du mauvais côté. (fig. B)
Racommodage d’une déchirure (fig. C)
Réglez la machine de la même façon que le
raccommodage.
Commencez par coudre le milieu de la déchirure en
guidant le tissu, puis coudre de chaque côté (bon côté et
mauvais côté).
Si nécessaire, renforce
rlacoutureaumoyend’unpetit
morceau de gaze placé à l’envers du tissu déchiré.
Herstelwerk
1. Overtuig u ervan dat de ontkoppelingsknop in de
( ) richting staat.
2. Stel uw machine in op... (fig A)
Steeklengteknop tussen 1-1.5
3. Leg een lapje stof over het versleten gedeelte.
Naai langs de rechterkant van de rand van het
lapje stof.
4. Knip het versleten gedeelte langs de naad weg aan
de achterkant van de stof. (fig B)
Herstellen van een scheur (fig C)
Stel de machine in op dezelfde manier als met
herstelwerk. Naai eerst beide randen van de scheur
aan elkaar. Naai daarna nog een naad op iedere kant
van de stof.(bovenkant en onderkant). Een stukje stof
kan aan de onderkant gelegd worden om de scheur te
versterken.
Rammendo
1. Assicurarsi che il pulsante di sblocco del volantino sia
nella posizione ( )
2. Regolate la macchina come indicato (fig. A)
Manopola lunghezza punto tra 1 e 1,5
3. Ricoprite completamente la parte rovinata con un
pezzo di stoffa identica. Eseguite una cucitura lungo il
bordo della pezza di tessuto aggiunta sul diritto del
tessuto.
4. Ritagliare la parte rovinata sul rovescio del tessuto
vicino al bordo cucito (fig. B)
Rammendo di uno strappo (fig. C)
Regolate la macchina come per il rammendo appena
visto.
Cominciate cucendo il centro dello strappo e guidando il
tessuto, quindi cucite su ogni lato. Se necessario
rinforzate la cucitura per mezzo di un pezzetto di garza
posizionato sul rovescio del tessuto strappato. La
pressione del piedino deve essere annullata.
K