
Instruction manual


49
English Français
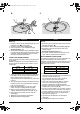
0.3 cm (1/8”)
L
d
t
m
a
b
0.4-1
12
BA
C
Making buttonhole
1. Be sure that the declutch knob in the handwheel is
in the ( ) direction.
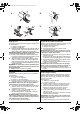
2. Measure the diameter and thickness of the button.
Add the thickness and 0.3 cm (for bar tacks) to
diameter. Mark the size of the buttonhole on the
fabric. (fig A)
For stretch fabrics, lay a piece of paper where
the buttonhole will be placed.
3. Attach the Buttonhole Foot. Completely push back
the sliding part a of buttonhole foot. Place material
under the foot so that the marking of buttonhole
passed through the center of foot. (fig B)
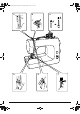
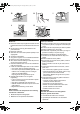
4. STEP 1 (front bar tack) (fig C)
Set pattern selection dial to No. 12
Set stitch length dial between 0.4-1
Lower the presser foot and sew 5-6 stitches. Stop
the machine so the needle is at the left side of the
stitches. Raise needle.
5.
STEP 2
(left side) (fig
D
)
Set pattern selection dial to No. 13
Sew left side from front to back until it reaches the end
of the marking. Stop the machine so the needle is at
the left side of the stitches. Raise needle.
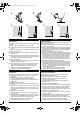
6. STEP 3 (back bar tack) (fig E)
Set pattern selection dial to No. 14
Sew 5-6 stitches. Stop the machine so the needle
is at the right side of the stitches. Raise needle.
7. STEP 4 (right side) (fig F)
Set pattern selection dial to No. 15
Sew right side from back to front until it catches the
front bar tack. Stop the machine so the needle is at
the left side of the stitches. Raise needle and
presser foot.
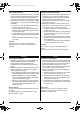
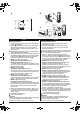
8. Remove the fabric from the machine. Place a pin
through the bar tacks to prevent over-cutting. Cut
the center of the buttonhole with a
Buttonhole
Cutter. (fig G)
Included in accessories.
Use buttonhole foot
Faire des boutonnières
1. Vérifier que le bouton de débrayage est bien
enclenché vers ( ).
2. Mesurer le diamètre et l’épaisseur du bouton.
Ajouter de l’épaisseur et 0,3 cm (pour le point
d’arrêt) au diamètre.
Marquer la taille de la boutonnière sur le tissu. (fig.
A
)
Pour du stretch, placer un morceau de papier là
où la boutonnière sera placée.
3. Mettre en place le pied-de-biche boutonnière.
Passer à l’arrière la partie lisse
a
du pied-de-biche
boutonnière. Placer le tissu sous le pied-de-biche de
tel sorte que la marque effectué pour la boutonnière
passe par le centre du pied-de-biche. (fig.
B
)
4. ETAPE 1 (point d’arrêt devant) (fig. C)
Régler le cadran sélecteur de point sur n° 12
Régler la longueur de point entre 0,4 - 1
Abaisser le pied-de-biche et coudre 5-6 points.
Arrêter la machine de tel sorte que l’aiguille du côté
gauche des points. Relever l’aiguille.
5. ETAPE 2 (côté gauche) (fig. D)
Régler le cadran sélecteur de point sur n° 13
Coudre d’avant en arrière jusqu’à ce
qu’il atteigne
la fin du marquage. Arrêter la machine avec
l’aiguille à gauche. Relever l’aiguille.
6. ETAPE 3 (point d’arrêt à l’arrière) (fig. E)
Régler le cadran sélecteur de point sur n° 14
Coudre 5 à 6 points. Arrêter la machine avec
l’aiguille à droite des points. Relever l’aiguille.
7. ETAPE 4 (côté gauche) (fig. F)
Régler le cadran sélecteur de point sur n° 15
Coudre le côté droit, de l’arrière a l’avant jusqu’à ce
qu’il rejoigne le point d’arrêt de devant. Arrêter la
machine avec l’aiguille à gauche des points.
Relever l’aiguille et le pied-de-biche.
8. Enlever le tissu de la machine. Placer une épingle
à travers le point d’arrêt pour éviter des erreurs de
découpe. Couper le centre de la boutonnière avec
un coupe boutonnière. (fig. G)
Inclus dans les accessoires.
L
Caution!
When using the buttonhole cutter to cut the buttonholes,
do not hold the fabric in front of the cutter.
Doing so could cause an injury to your hand.
Attention!
Lorsque vous utilisez le couteau à boutonnière pour
ouvrir la boutonnières, ne tenez pas le tissu juste
devant le couteau à boutonnière.
Sinon vous risquez de vous blesser la main.