
Operation Manual


34
English Français
AB C
DE F
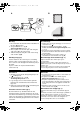
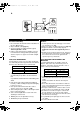
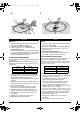
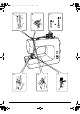
English: Piping / Zipper Foot
Français: Pied passepoil /
Fermeture à glissière
English: Piping cord
Français: Cordonnet
English: Sewing on the
seam line
Français: Coudre en suivant
la ligne de couture
Piping / Zipper Foot
The Piping / Zipper Foot can be used to set in a zip and can also
be used when producing and attaching piping.
Use Straight stitch, normally set a stitch length 2.5 (medium
stitch length).
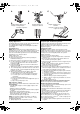
Changing the Foot
NOTE: Switch off the power to the sewing machine before
changing a presser foot. The sewing machine needle is a sharp
object and could cause injury; take care when changing the
presser feet. It would be a good idea to remove the needle, while
changing feet, as a safety precaution.
Switch off the power.
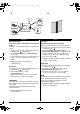
A. Raisse the presser foot.
B. Raise the needle to its highest position by rotating the
handwheel towards you.
C. Raise the foot release lever and remove the foot. (fig A)
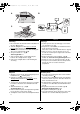
D. Use the needle plate screwdriver to loosen the screw of the
presser foot holder and remove the foot holder from the
needle bar. (fig B)
E. Position the piping / zipper foot on to the needle bar from
back to front. (fig C)
F. Tighten the presser foot screw, using the needle plate screw driver.
G. Loosen the adjusting screw and move the toe to the left or
right of the needle, as desired. tighten the adjusting screw to
hold the toe in position.
H. when you have finished using the piping / zipper foot;
1) Switch off the power to the sewing machine.
2) The needle and presser foot must be in the raised position.
3) Loosen the presser foot screw with the needle plate
screw driver.
4) Remove the piping / zipper foot.
5) Position the presser foot holder and tighten the presser
foot screw.
6) Clip on the general purpose foot.
Zipper Insertion / Sewing
Please refer to your instruction manual and / or tuitional DVD / Video.
Inserting Piping
• Cut strips wide enough to cover the piping cord plus seam
allowances.
• Mark the seam line on the article.
• Pin and baste the piping strip and cord to the article, along the
seam line.
• Pin and baste the backing fabric in place.
• Stitch on the seam line as close to the piping cord as possible.
Neaten and trim the seam allowance.
• Turn the article through to the right side.
NOTE: If you make the piping and sew it into a seam, the
stitching should be closer to the cord to cover the 1
st
row of
stitching (piping stitching).
❈ Piping / Zipper Foot is an optional accessory.
Pied passepoil / Fermeture à glissière
Le pied passepoil / fermeture peut être utilisé aussi bien pour les
fermetures à glissière que pour le passepoil.
Utilisez le point droit, en réglant la longueur de point à 2,5
(longueur moyenne).
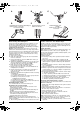
Changement de pied
Information:
Eteindre la machine avant de changer le pied.
L’aiguille est pointure et peut donc causer des blessures, soyez donc
prudent lorsque vous changez le pied-de-biche. Dans la mesure du
possible pensez à enlever l’aiguille pendant cette opération.
Eteindre la machine
A. Relevez le levier de pied-de-biche.
B. Relevez l’aiguille à sa position la plus haute en tournant le
volant vers soi.
C. Poussez le levier de changement de pied-de-biche vers
vous et retirez le pied en place. (fig. A)
D. Utilisez le tournevis pour dévisser la vis du support de pied-
de-biche. (fig. B)
E. Mettre en place le pied passepoil / fermeture sur la barre
aiguille de l’arrière vers l’avant. (fig. C)
F. Serrer la vis à l’aide du tournevis.
G. Desserrez la vis de réglage et déplacez le pied à gauche ou
à droite de l’aiguille, comme vous le souhaitez. Resserrez la
vis de réglage pour maintenir le pied en position.
H. Lorsque vous avez fini d’utiliser le pied passepoil / fermeture;
1) Eteindre la machine.
2) L’aiguille et le pied-de-biche doivent être en position relevé.
3) Desserrez la vis du pied avec le tournevis plat destiné à
la plaque aiguille.
4) Retirez le pied passepoil / fermeture à glissière.
5) Mettre en place le support de pied-de-biche et serrez la
vis de serrage.
6) Clipper le pied universel.
Utilisation du pied pour coudre une fermeture à glissière
Merci de vous reporter au manuel d’utilisation et au DVD.
Utilisation du pied pour le passepoil
• Coupez des bandes de tissu suffisamment larges pour couvrir
la corde et pour coudre.
• Tracez la ligne de couture sur le tissu.
• Epinglez et faites un bâti avec la bande de tissu et la corde sur
l’ouvrage.
• Epinglez et bâtissez l’arrière de l’ouvrage pour le maintenir en
place. Coudre avec ligne de couture le long de la corde.
• Tournez l’ouvrage vers la droite.
Pour information: Si vous réalisez le passepoil et que vous
devez coudre par dessus en suivant la ligne de couture, vous
devez coudre de façon à ce que la 2
nde
couture soit plus proche
de la corde que la première.
❈ Le pied passepoil / fermeture à glissière est un accessoire
en option.
RS2000-2D_EFNI.book Page 34 Wednesday, July 27, 2005 7:39 AM