
Operation Manual


43
English Français
AB C
DE F
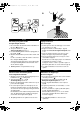
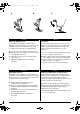
Darning Foot
A. Rotate the handwheel toward you and raise the
needle to its highest position. And then turn off the
power.
B. Lift the presser foot lever to raise the presser foot.
C. Attach the darning foot.
D. Select either straight (center needle position) or
zigzag stitch.
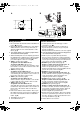
E. Lower the feed dog.
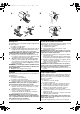
F. Leave about 4 inches (10 cm) of lower thread tail
after threading.
G. Place the fabric under the presser foot.
H. If the fabric does not slide under the presser foot,
raise the presser foot.
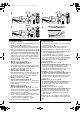
I. Turn the handwheel toward you to bring up the
lower thread.
J. By holding the lower thread gently, sew about 4
stitches.
• For darning, cut off any excess threads.
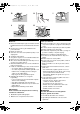
• For free-motion quilting, use a sewing needle to
hide the excess threads underneath the quilting
pieces. Trim any threads that are still showing.
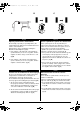
K. Use both hands to guide the fabric and keep it in its
place.
• Trace your design on the material and place it in
an embroidery hoop.
• Make sure the material is taut.
• Lay a stabilizer underneath when embroidering
on a thin fabric.
• Guide the hoop with your hands.
IMPORTANT
Remember to raise the feed dog when you have
finished.
❈ Embroidery hoop not include.
❈ Darning Foot is an optional accessory.
Pied libre pour reprisage
A. Amenez l’aiguille en position haute et coupez
l’alimentation électrique.
B. Relevez le levier presseur.
C. Placez le pied libre pour reprisage.
D. Choisir un point droit (position centrale) ou un point
zig zag.
E. Abaissez la griffe d’entraînement.
F. Après l’enfilage de l’aiguille, laissez environ 10 cm
de fil.
G. Placez le tissu sous le pied-de-biche.
H. Si le tissu a du mal à passez sous le pied, relevez
le levier de pied-de-biche.
I. Tournez le volant vers vous pour faire remonter le
fil inférieur.
J. En tenant doucement le fil de la canette d’une
main, cousez 4 ou 5 points.
• Pour repriser, coupez les fils en excès.
• Pour créer un motif, faire passer l’excès de fils
sous le tissu à l’aide d’une aiguille à coudre.
Coupez les fils qui restent apparent.
K. Vous servir de vos deux mains pour guider le tissu
et pour bien le maintenir en place.
• Dessinez le motif que vous souhaitez réaliser sur
le tissu et placez le ensuite à l’intérieur du cercle
à broder.
• Assurez vous que le tissu soit bien tendu.
• Pour du tissu fin, placez un papier en dessous
pour créer artificiellement une épaisseur.
• Guider le cercle de vos mains.
IMPORTANT
N’oubliez pas de remonter les griffes d’entraîne-
ment lorsque vous avez terminé.
❈ Cercle à broder non fourni.
❈ Le pied libre pour reprisage est un accessoire
en option.
RS2000-2D_EFNI.book Page 43 Wednesday, July 27, 2005 7:39 AM