ASSEMBLY INSTRUCTIONS METAL GARDEN SHED SKU: T-PS23-0230 E-mail: hofficeservice@gmail.com Please read the instructions strictly, please assemble this table according to the instruction assembly order.
BEFORE YOU BEGIN Owner's Manual Before beginning construction, check local building codes regarding footings, location and other requirements.Study and understand this owner's manual. Important information and helpful tips will make your construction easier and more enjoyable. Assembly Instructions: Instructions are supplied in this manual and contain all appropriate information for your building model. Review all instructions before you begin.
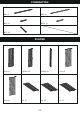
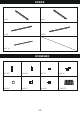
FOUNDATION BS1 X1 BS2 X1 BS1L X1 BS2L X1 BF3 X2 PLATES W1A X7 WS2A X4 WS3A X2 DLA X1 DRA X1 P1 X1 P2 X2 P3 X1 03
PLATES 21L X1 P4 X1 12L X1 12R X1 21R X1 STRIPS ULA X1 UR1 X1 B1 X4 DX2 X4 US1R X1 20 X4 9 X1 10L X1 10R X1 11 X1 04
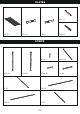
STRIPS 15 X1 16 X1 17 X2 18 X2 US1 X1 STANDARD DC X2 DH X4 DF X1 DG X1 GC X4 GS X1 V1 X115 V2 X175 05
SCREW M4x10 F1 X215 M4x10 F2 X8 M6x10 M5x12 F3 X32 M4x16 F5 X4 06 F4 X5
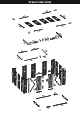
STRUCTURE VIEW GC 18 18 16 17 GC P2 P3 P2 P1 GC P4 18 15 17 17 GC 21R 12R B1 12L B1 B1 B1 21L 10R 11 10L GS USIR 9 US1 WS2A W1A W1A W1A W1A WS3A W1A 20 20 WS2A DH W1A W1A DX2 DH DLA WS3A WS2A ULA DF WS2A DX2 DC DG DRA UR1 DX2 DH DC DX2 DH 20 20 BS2L BS2 BF3 BF3 BS1 BS1L 07
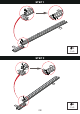
STEP 1 F1 BS1 BS1 BS1L BS1 F1 BS1L F1 X2 STEP 2 F1 BS2 BS2 BS2L BS2L BS2 F1 BS2L 08 F1 X2
STEP 3 F1 BS2 BS2 BF3 BF3 BS2 BS2L BF3 BS1 BS1L BF3 BF3 F1 BS1L F1 X4 BS1L STEP 4 F1 BS2L BS2L BF3 BF3 BS2L BF3 BS2 BS1 BF3 F1 BS1L BF3 BF3 BS1 09 BS1 F1 X4
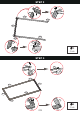
STEP 5 WS2A WS2A F1 V2 BS1 F1 X3 V2 X3 STEP 6 WS2A F1 V2 WS2A BS1 10 F1 X3 V2 X3
STEP 7 F1 WS2A V2 BS1 F1 X4 V2 X4 F1 X4 V2 X4 STEP 8 WS2A F1 V2 BS1 11
STEP 9 US1 US1 BS1 V2 F1 F1 X2 V2 X2 F1 X3 V2 X2 STEP 10 You can gently pull the wall panel to insert accessories.
STEP 11 F1 V2 10R X2 10R 10L F1 X2 F1 V2 10L Fix the hole on the top of 10L、 10R 10R F1 X7 V2 X7 STEP 12 F1 V2 X4 11 9 13 F1 X4 V2 X4
STEP 13 ULA ULA V2 F1 ULA ULA ULA V2 F1 14 F1 X4 V2 X4
STEP 14 UR1 UR1 V2 UR1 V2 F1 F1 UR1 UR1 15 F1 X4 V2 X4
STEP 15 W1A W1A W1A W1A W1A WS3A W1A W1A WS3A F1 V2 W1A W1A WS3A WS2A W1A W1A W1A W1A WS3A W1A WS3A 16 F1 X64 V2 X64
STEP 16 F2 12L F2 F2 B1 12R B1 B1 B1 F2 X6 V2 X6 STEP 17 First, screw 12L and 12R onto the shed. The leftmost and rightmost screws of the 12L and 12R are not fixed first.
STEP 18 P4 P2 F1 P3 V2 P2 P1 18 F1 X36 V2 X36
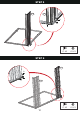
STEP 19 F5 GC 17 F1 17 F5 15 18 v2 18 17 x4 17 x2 16 18 19 F1 X2 F5 X4 V2 X2 16
STEP 20 20 Note: make clear the front and back of the door panel DLA 20 STEP 21 V2 F1 outside inside DF F4 F1 20 F1 X10 F4 X2 V2 X8
STEP 22 F1 DH DX2 DLA F1 F3 DX2 DH F1 X2 21 F1 X4 F3 X8
STEP 23 DC DC DC F1 DC 22 F1 X8
STEP 24 20 Note: make clear the front and back of the door panel DRA 20 STEP 25 V2 F1 DG inside outside DG F4F4 F4 F4 F1 23 F1 X10 F4 X3 V2 X8
STEP 26 20 DH DX2 DRA F3 X2 DX2 DH 20 24 F1 X4 F3 X8
STEP 27 DRA DLA UR1 F3 DRA X4 25 F3 X16
STEP 28 V1 V2 26 F1 V1 X115
CARE & SAFETY • Unsuitable for storage of flammable or corrosive substances. • It is of utmost importance to assemble all of the parts according to the directions. Do not skip any step. • Please consult your local authorities if any permits are required to erect shed. • Periodically check shed to assure that it remains stable and that the site remains level.