
User's Manual


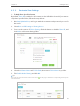
Table Of Contents
- About This Guide
- Get to Know About Your Router
- Connect the Hardware
- Log into Your Router
- Set Up Internet Connection
- Guest Network
- USB Application
- Parental Controls
- QoS
- Network Security
- NAT Forwarding
- VPN Server
- Customize Your Network Settings
- Manage the Router
- 13. 1. Set Up System Time
- 13. 2. Test the Network Connectivity
- 13. 3. Upgrade the Firmware
- 13. 4. Backup and Restore Configuration Settings
- 13. 5. Change the Administrator Account
- 13. 6. Password Recovery
- 13. 7. Local Management
- 13. 8. Remote Management
- 13. 9. System Log
- 13. 10. Monitor the Internet Traffic Statistics
- 13. 11. Control LEDs
- FAQ

31
Chapter 6
USB Application
2. Enable Authentication for Data Security
It is strongly recommended that you set and apply a sharing account for data
security.
1 ) Visit http://tplinkwifi.net, and log in with the username and password you set
for the router.
2 ) Select Advanced > USB Settings > Sharing Access.
3 ) Choose Use default Account (admin) or Use New Account and click Save.
Note:
For Windows users, do not set the sharing username the same as the Windows username. Otherwise, Windows
credential mechanism may cause the following problems:
• If the sharing password is also the same as the Windows password, authentication will not work since the
Windows will automatically use its account information for USB access.
• If the sharing password is different from the Windows password, the Windows will be unable to remember
your credentials and you will always be required to enter the sharing password for USB access.
4 ) Enable Authentication to apply the sharing account.
• If you leave Share All enabled, click the button to enable Authentication for all
folders.
• If Share All is disabled, enable Authentication for specific folders.