
Specifications
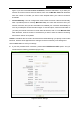

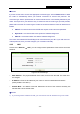
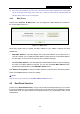
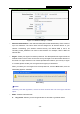
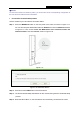
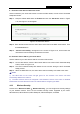
Table Of Contents
- Package Contents
- Chapter 1. Introduction
- Chapter 2. Connecting the router
- Chapter 3. Quick Installation Guide
- Chapter 4. Configuring the router
- 4.1 Login
- 4.2 Status
- 4.3 Quick Setup
- 4.4 Network
- 4.5 Dual Band Selection
- 4.6 Wireless 2.4GHz
- 4.7 Wireless 5GHz
- 4.8 Guest Network
- 4.9 DHCP
- 4.10 USB Settings
- 4.11 NAT
- 4.12 Forwarding
- 4.13 Security
- 4.14 Parent Control
- 4.15 Access Control
- 4.16 Advanced Routing
- 4.17 Bandwidth Control
- 4.18 IP & MAC Binding
- 4.19 Dynamic DNS
- 4.20 IPv6
- 4.21 System Tools
- 4.22 Logout
- Appendix A: FAQ
- Appendix B: Configuring the PC
- Appendix C: Specifications
- Appendix D: Glossary

Archer C20i AC750 Wireless Dual Band Router
- 39 -
)
Note:
To build a successful connection by WPS, you should also do the corresponding configuration of
the new device for WPS function meanwhile.
I. Use the Wi-Fi Protected Setup Button
Use this method if your client device has a WPS button.
Step 1: Press the WPS/Reset button on the side panel of the router, as shown in Figure 4-17.
You can also keep the default WPS status as Enabled and click the Add device button
in Figure 4-16. Then choose “Press the WPS button of the new device within the
next two minutes” and click Connect, shown in Figure 4-18.
Figure 4-17
Figure 4-18 Add A New Device
Step 2: Press and hold the WPS button of the client device.
Step 3: The Wi-Fi Protected Setup LED flashes for two minutes during the Wi-Fi Protected Setup
process.
Step 4: When the WPS LED is on, the client device has successfully connected to the router.