
User's Manual


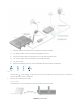
Table Of Contents
- Chapter 1. Get to Know About Your Router
- Chapter 2. Connect the Hardware
- Chapter 3. Log into Your Router
- Chapter 4. Set Up Internet Connection
- Chapter 5. Guest Network
- Chapter 6. USB Application
- Chapter 7. Parental Controls
- Chapter 8. Security
- Chapter 9. NAT Forwarding
- Chapter 10. QoS
- Chapter 11. Specify the Network Settings
- 4. Enter the username, password and domain name of the account (such as lisadns.ddns.net).
- 5. Click Login and Save.
- 1. Change the routers LAN IP addresses to two different IP addresses on the same subnet. Disable Router 2’s DHCP function.
- 2. Visit http://tplinkwifi.net, and log in with the username and password you set for the router. Go to Network →Advanced Routing. Click Add to add a new static routing entry.
- Chapter 12. Administrate Your Network
- Visit http://tplinkwifi.net, and log in with the username and password you set for the router.
- Go to Advanced > System Tools > Administration. In Remote Management section, finish the settings according to your needs.
- Appendix A: Specifications
- Appendix B: Troubleshooting Guide & FAQ
- Appendix C: Configure the PC
2.1 Requirements for Operation
To connect and use the router for Internet sharing, you must have the following:
• Broadband Internet Access Service (DSL/Cable/Ethernet).
• PCs with an active Ethernet Adapter and an Ethernet cable with RJ45 connectors.
• TCP/IP protocol on each PC.
• Web browser, such as Microsoft Internet Explorer, Mozilla Firefox and Apple Safari.
2.2 Position Your Router
• The Product should not be located where it will be exposed to moisture or excessive heat.
• Place the router in a location where it can be connected to the various devices as well as to a power source.
• Make sure the cables and power cord are safely placed out of the way so they do not create a tripping hazard.
• The router can be placed on a shelf or desktop.
• Keep away from the strong electromagnetic radiation and the device of electromagnetic sensitive.
2.3 Connect Your Router
Follow the steps below to connect your router.
1. If your Internet connection is through an Ethernet cable from the wall instead of through a DSL / Cable / Satellite
modem, connect the Ethernet cable directly to the router’s Internet port, then follow steps 5 and 6 to complete
the hardware connection.
Chapter 2 Connect 9