
User's Manual
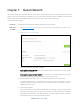
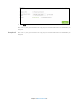


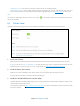
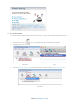

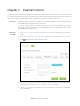
Table Of Contents
- Chapter 1. Get to Know About Your Router
- Chapter 2. Connect the Hardware
- Chapter 3. Log into Your Router
- Chapter 4. Set Up Internet Connection
- Chapter 5. Guest Network
- Chapter 6. USB Application
- Chapter 7. Parental Controls
- Chapter 8. Security
- Chapter 9. NAT Forwarding
- Chapter 10. QoS
- Chapter 11. Specify the Network Settings
- 4. Enter the username, password and domain name of the account (such as lisadns.ddns.net).
- 5. Click Login and Save.
- 1. Change the routers LAN IP addresses to two different IP addresses on the same subnet. Disable Router 2’s DHCP function.
- 2. Visit http://tplinkwifi.net, and log in with the username and password you set for the router. Go to Network →Advanced Routing. Click Add to add a new static routing entry.
- Chapter 12. Administrate Your Network
- Visit http://tplinkwifi.net, and log in with the username and password you set for the router.
- Go to Advanced > System Tools > Administration. In Remote Management section, finish the settings according to your needs.
- Appendix A: Specifications
- Appendix B: Troubleshooting Guide & FAQ
- Appendix C: Configure the PC

Enable Write Access: If you tick this check box, network clients can modify this folder.
Enable Media Sharing: Tick to enable media sharing for this folder, and you can view photos, play music and
watch movies stored on the USB disk directly from DLNA-supported devices. Click Media Sharing
to learn more.
Note:
The router can share eight volumes at most. You can click
on the page to detach the corresponding volume you
do not need to share.
6.3 Printer Sever
The feature of Printer Sharing helps you share a printer with different computers connected to the router.
1. Connect the Printer
Cable a printer to the USB port with the USB cable. Wait several seconds until the USB LED becomes solid on.
Note: You can check Printer Compatibility List to verify whether your printer is supported by the Router. Printers
unlisted may be incompatible with the router. To get the list, visit
http://www.tp-link.com/app/usb/.
2. Install the Driver of the Printer
Make sure you have installed the driver of the printer on each computer that needs printer service.
If you do not have the driver, contact the printer manufacturer.
3. Install the TP-LINK USB Printer Controller Utility
TP-LINK USB Printer Controller Utility helps you access the shared printer. Download and Install the utility on each
computer that needs printer service.
You can get the utility from http://www.tp-link.com/app/usb/
.
PC Utility is for Windows computer and Mac Utility
is for Mac computer.
Chapter 6 USB Application26