
User's Manual
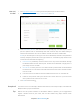

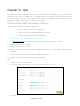
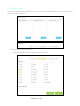
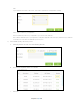


Table Of Contents
- Chapter 1. Get to Know About Your Router
- Chapter 2. Connect the Hardware
- Chapter 3. Log into Your Router
- Chapter 4. Set Up Internet Connection
- Chapter 5. Guest Network
- Chapter 6. USB Application
- Chapter 7. Parental Controls
- Chapter 8. Security
- Chapter 9. NAT Forwarding
- Chapter 10. QoS
- Chapter 11. Specify the Network Settings
- 4. Enter the username, password and domain name of the account (such as lisadns.ddns.net).
- 5. Click Login and Save.
- 1. Change the routers LAN IP addresses to two different IP addresses on the same subnet. Disable Router 2’s DHCP function.
- 2. Visit http://tplinkwifi.net, and log in with the username and password you set for the router. Go to Network →Advanced Routing. Click Add to add a new static routing entry.
- Chapter 12. Administrate Your Network
- Visit http://tplinkwifi.net, and log in with the username and password you set for the router.
- Go to Advanced > System Tools > Administration. In Remote Management section, finish the settings according to your needs.
- Appendix A: Specifications
- Appendix B: Troubleshooting Guide & FAQ
- Appendix C: Configure the PC

3) Set a low priority rule for the WIFI-GUEST:
a. Select By Physical Port and then select WIFI-HOST. Click OK.
4) The QoS rules list will display in the table.
Note: If you want to delete a QoS rule, click to remove the responding rule from the list.
Update the Database
In the Application list, we may not list all of the applications, a new database version may contain more
applications. New database versions are posted at www.tp-link.com and can be downloaded for free. There is
no need to upgrade the database unless the new database has a new application you need.
1) Download the latest upgrade database upgrade file from our website (www.tp-link.com).
Chapter 10 QoS49