
User's Manual
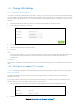
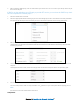
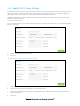
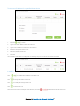
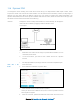
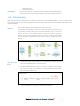
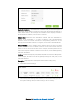

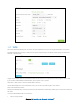
Table Of Contents
- Chapter 1. Get to Know About Your Router
- Chapter 2. Connect the Hardware
- Chapter 3. Log into Your Router
- Chapter 4. Set Up Internet Connection
- Chapter 5. Guest Network
- Chapter 6. USB Application
- Chapter 7. Parental Controls
- Chapter 8. Security
- Chapter 9. NAT Forwarding
- Chapter 10. QoS
- Chapter 11. Specify the Network Settings
- 4. Enter the username, password and domain name of the account (such as lisadns.ddns.net).
- 5. Click Login and Save.
- 1. Change the routers LAN IP addresses to two different IP addresses on the same subnet. Disable Router 2’s DHCP function.
- 2. Visit http://tplinkwifi.net, and log in with the username and password you set for the router. Go to Network →Advanced Routing. Click Add to add a new static routing entry.
- Chapter 12. Administrate Your Network
- Visit http://tplinkwifi.net, and log in with the username and password you set for the router.
- Go to Advanced > System Tools > Administration. In Remote Management section, finish the settings according to your needs.
- Appendix A: Specifications
- Appendix B: Troubleshooting Guide & FAQ
- Appendix C: Configure the PC

11.3 Specify DHCP Server Settings
By default, the DHCP (Dynamic Host Configuration Protocol) Server is enabled and the router acts as a DHCP server; it
dynamically assigns TCP/IP parameters to client devices from the IP Address Pool. You can change the settings of
DHCP Server if necessary, and you can reserve LAN IP address for specified client device.
Visit http://tplinkwifi.net, and log in with the username and password you set for the router, and go to Advanced >
Network > DHCP Server page.
To use the router as an AP:
If you use another device on your network as the DHCP server, and the router act as an AP, you can disable the DHCP
feature in the router.
1. Clear the Enable DHCP Server check box.
2. Click Save.
To specify the IP address that the router assigns:
3. Make sure that the Enable DHCP Server check box is selected.
4. Type in the starting and ending IP address in the IP Address Pool.
5. Type in other parameters if the ISP offers, the Default Gateway is automatically filled the same as the LAN IP
address of the router.
6. Click Save.
Chapter 11 Specify the Network Settings54