
User's Manual

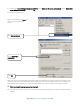


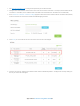
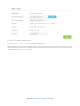

Table Of Contents
- Chapter 1. Get to Know About Your Router
- Chapter 2. Connect the Hardware
- Chapter 3. Log into Your Router
- Chapter 4. Set Up Internet Connection
- Chapter 5. Guest Network
- Chapter 6. USB Application
- Chapter 7. Parental Controls
- Chapter 8. Security
- Chapter 9. NAT Forwarding
- Chapter 10. QoS
- Chapter 11. Specify the Network Settings
- 4. Enter the username, password and domain name of the account (such as lisadns.ddns.net).
- 5. Click Login and Save.
- 1. Change the routers LAN IP addresses to two different IP addresses on the same subnet. Disable Router 2’s DHCP function.
- 2. Visit http://tplinkwifi.net, and log in with the username and password you set for the router. Go to Network →Advanced Routing. Click Add to add a new static routing entry.
- Chapter 12. Administrate Your Network
- Visit http://tplinkwifi.net, and log in with the username and password you set for the router.
- Go to Advanced > System Tools > Administration. In Remote Management section, finish the settings according to your needs.
- Appendix A: Specifications
- Appendix B: Troubleshooting Guide & FAQ
- Appendix C: Configure the PC

Appendix C: Configure the PC
In this section, we’ll introduce how to install and configure the TCP/IP correctly in Windows 7. First make sure your
Ethernet Adapter is working, refer to the adapter’s manual if needed.
1. Install TCP/IP component
1) On the Windows taskbar, Right-click Network icon , and select Open Network and Sharing Center >
Change adapter settings.
2) Right-click your wired network connection (Local Area Connection or Ethernet by default), and select
Properties.
3) Double-click Internet Protocol Version 4 (TCP/IPv4).
Appendix C: Configure the PC83