User Guide AC900 High Power Wireless Dual Band Router Archer C28HP REV1.0.
Contents About This Guide..........................................................................................................1 Chapter 1. Get to Know About Your Router . . . . . . . . . . . . . . . . . . . . . . . . . . . 2 1. 1. 1. 2. Product Overview . . . . . . . . . . . . . . . . . . . . . . . . . . . . . . . . . . . . . . . . . . . . . . . . . . . . . . . . . . . . 3 Panel Layout . . . . . . . . . . . . . . . . . . . . . . . . . . . . . . . . . . . . . . . . . . . . . . . . . . . . . . . . . .
4. 7. 4. 6. 2.Use PPTP VPN to Access Your Home Network . . . . . . . . . . . . . . . . . . . . . . . 32 Customize Your Network Settings . . . . . . . . . . . . . . . . . . . . . . . . . . . . . . . . . . . . . . . . . . 37 4. 7. 1.Change the LAN Settings . . . . . . . . . . . . . . . . . . . . . . . . . . . . . . . . . . . . . . . . . . . . 37 4. 7. 2.Set Up Link Aggregation . . . . . . . . . . . . . . . . . . . . . . . . . . . . . . . . . . . . . . . . . . . . . 37 4. 7. 3.
5. 6. Manage the Router . . . . . . . . . . . . . . . . . . . . . . . . . . . . . . . . . . . . . . . . . . . . . . . . . . . . . . . . 71 5. 6. 1.Set Up System Time . . . . . . . . . . . . . . . . . . . . . . . . . . . . . . . . . . . . . . . . . . . . . . . . . 71 5. 6. 2.Control LEDs . . . . . . . . . . . . . . . . . . . . . . . . . . . . . . . . . . . . . . . . . . . . . . . . . . . . . . . . 72 5. 6. 3.Power Schedule . . . . . . . . . . . . . . . . . . . . . . . . . . . . . . . . . . . . . . . .
About This Guide This guide is a complement of Quick Installation Guide. The Quick Installation Guide instructs you on quick Internet setup, and this guide provides details of each function and shows you the way to configure these functions appropriate to your needs. When using this guide, please notice that features of the router may vary slightly depending on the model and software version you have, and on your location, language, and Internet service provider.
Chapter 1 Get to Know About Your Router This chapter introduces what the router can do and shows its appearance.
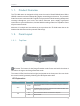
Chapter 1 1. 1. Product Overview The TP-LINK router is designed to fully meet the need of Small Office/Home Office (SOHO) networks and users demanding higher networking performance. The powerful antennas ensure continuous Wi-Fi signal to all your devices while boosting widespread coverage throughout your home, the built-in Ethernet ports supply high-speed connection to your wired devices, and the flexible working modes are capable to meet all your network needs.
Chapter 1 LED Explanation Name Status Blue On WAN PWR 2.4G/5G RE 1. 2. 2. Orange On Indication The Internet is available. The router’s WAN port is connected, but the Internet is not available. Off The router’s WAN port is not connected. On System initialization completes. Blinking System initialization or firmware upgrade is in progress. Do not disconnect or power off the router. Off Power is off. On The corresponding wireless function (2.4G/5G) is working properly.
Chapter 1 Item Description WPS If your clients, such as wireless adapters, that support Wi-Fi Protected Setup, then you can press this button to quickly establish a connection between the router and clients and automatically configure wireless security for your wireless network. The wireless security will be automatically configured for your wireless network. Ethernet Ports (1/2/3/4) For connecting your PCs or other wired network devices to the router.
Chapter 2 Connect to the Internet This chapter contains the following sections: • “Position Your Router” • “Connect to the Internet”
Chapter 2 2. 1. Position Your Router • The product should not be located in a place where it will be exposed to moisture or excessive heat. • Place the router in a location where it can be connected to multiple devices as well as to a power source. • Make sure the cables and power cord are safely placed out of the way so they do not create a tripping hazard. • The router can be placed on a shelf or desktop.
Chapter 2 2. 2. 2. Router mode This mode enables multiple users to share Internet connection via ADSL/Cable Modem. 1. Follow the steps below to connect your router. If your Internet connection is through an Ethernet cable from the wall instead of through a DSL / Cable / Satellite modem, connect the Ethernet cable directly to the router’s WAN port, and then follow Step 4 and 5 to complete the hardware connection. 4 Connect the power adpter to the router and turn on the router.
Chapter 2 1 ) Find the SSID (Network Name) and Wireless Password printed on the label at the bottom of the router. 2 ) Click the network icon of your computer or go to Wi-Fi Settings of your smart device, and then select the SSID to join the network. Computer Smart Device < Settings Connections are available Wireless Network Connection OR TP-LINK_XXXX TP-LINK_XXXX_5G Connect automatically Connect Wi-Fi Wi-Fi CHOOSE A NETWORK... TP-LINK_XXXX TP-LINK_XXXX_5G Other...
Chapter 2 Note: If the above screen does not pop-up, it means that your IE Web-browser has been set to a proxy. Go to Tools menu > Internet Options > Connections > LAN Settings, in the screen that appears, cancel the Using Proxy checkbox, and click OK to finish it. 4. After successfully login, follow Quick Setup to complete the configuration. 5.
Chapter 2 3 ) After successfully login, select Range Extender mode and follow Quick Setup to complete the configuration. Tips: Click Survey to choose your host network and fill in its wireless password. 2. Relocate: Place the router between your host router and the Wi-Fi dead zone. The location you choose must be within the range of your existing host network. Host Network Host Router Extended Network High Power Router Client 3.
Chapter 2 4. Enter http://tplinkwifi.net in the address bar of a web browser. Use admin for password, and then click Login. Note: If the above screen does not pop-up, it means that your IE Web-browser has been set to a proxy. Go to Tools menu > Internet Options > Connections > LAN Settings, in the screen that appears, cancel the Using Proxy checkbox, and click OK to finish it. 5.
Chapter 3 Log in This chapter shows how to log in to the web management page of router.
Chapter 3 With the web-based utility, it is easy to configure and manage the router. The webbased utility can be used on any Windows, Macintosh or UNIX OS with a Web browser, such as Microsoft the Internet Explorer, Mozilla Firefox or Apple Safari. Follow the steps below to log in to your router. 1. Set up the TCP/IP Protocol in Obtain an IP address automatically mode on your computer. 2. Visit http://tplinkwifi.net, and log in with the username and password you set for the router.
Chapter 4 Configure the router in Router Mode This chapter presents how to configure the various features of the router working as a standard wireless router.
Chapter 4 4. 1. Guest Network 4. 1. 1. Create a Network for Guests This function allows you to provide Wi-Fi access for guests without disclosing your main network. When you have guests in your house, apartment, or workplace, you can create a guest network for them. In addition, you can customize guest network options to ensure network security and privacy. 1. Visit http://tplinkwifi.net, and log in with password you set for the router. 2. Go to Advanced > Guest Network.
Chapter 4 • Allow guests to see each other • Allow guests to access my local network Check this box if you want to allow the wireless clients on your guest network to communicate with each other via methods such as network neighbors and Ping. Check this box if you want to allow the wireless clients on your guest network to communicate with the devices connected to your router’s LAN ports or main network via methods such as network neighbors and Ping. 4. Click Save.
Chapter 4 3. Click Add. And then Click View Existing Devices, and select the access device. Or, input the Device Name and MAC Address manually. 4. Click the icon to set the Internet Access Time. Drag the cursor over the appropriate cell(s) and click OK. 5. Enter a Description for the entry, check the box for Enable This Entry, and then click OK. 6. Select Whitelist as the restriction policy.
Chapter 4 Tips: • With Blacklist selected, the controlled devices cannot access any websites containing the specified keywords during the Internet Access Time period. • With Whitelist selected, the controlled devices can only access websites containing the specified keywords during the Internet Access Time period. 7. Click . Enter a website and click Save. You can add up to 32 keywords for either Blacklist or Whitelist. Below are some sample entries to allow access.
Chapter 4 3 ) Select Enable QoS. 4 ) Input the maximum upload and download bandwidth provided by your Internet service provider. 1Mbps equal s to 1000Kbps. 5 ) Click Advanced and drag the scroll bar to set the bandwidth priority percentage. 6 ) Click Save. 2. Add a middle priority QoS rule for the phone. 1 ) Click Add in Qos Rule List section. 2 ) Click View Existing Devices.
Chapter 4 3 ) Choose the respective device from the list. 4 ) Click OK. 3. Refer to the steps above to apply other QoS rules if any. Note: If you want to delete a QoS rule, click the list. Done! to remove the responding rule from Now QoS is implemented to prioritize Internet traffic. 4. 4. Network Security 4. 4. 1.
Chapter 4 1. Visit http://tplinkwifi.net, and log in with password you set for the router. 2. Go to Advanced > Security > Settings. 3. Enable DoS Protection. 4. Set the level (Off, Low, Middle or High) of protection for ICMP-FLOOD Attack Filtering, UDP-FlOOD Attack Filtering and TCP-SYN-FLOOD Attack Filtering. • • • ICMP-FLOOD Attack Filtering - Enable to prevent the ICMP (Internet Control Message Protocol) flood attack.
Chapter 4 4. 4. 2. Access Control Access Control is used to block or allow specific client devices to access your network (via wired or wireless) based on a list of blocked devices (Blacklist) or a list of allowed devices (Whitelist). I want to: Block or allow specific client devices to access my network (via wired or wireless). How can I do that? 1. Visit http://tplinkwifi.net, and log in with password you set for the router. 2. Go to Advanced > Advanced-Settings > Access Control. 3.
Chapter 4 2 ) Click Add in the Devices in Whitelist section. Enter the Device Name and MAC Address (You can copy and paste the information from the Online Devices list if the device is connected to your network). 3 ) Click OK. Now you can block or allow specific client devices to access your network (via wired or wireless) using the Blacklist or Whitelist. Done! 4. 4. 3.
Chapter 4 To bind the connected device(s): Click to add the corresponding device to the Binding List. To bind the unconnected device 1 ) Click Add in the Binding List section. 2 ) Enter the MAC address and IP address that you want to bind. Enter a Description for this binding entry. Done! 4. 5. 3 ) Check the box for Enable This Entry and click OK.
Chapter 4 Virtual Servers can keep the local network safe as other services are still invisible from the Internet. Virtual Servers can be used for setting up public services on your local network, such as HTTP, FTP, DNS, POP3/SMTP and Telnet. Different services use different service ports. Port 80 is used in HTTP service, port 21 in FTP service, port 25 in SMTP service and port 110 in POP3 service. Please verify the service port number before the configuration.
Chapter 4 Tips: • It is recommended to keep the default settings of Internal Port and Protocol if you are not clear about which port and protocol to use. • If the service you want to use is not in the Service Type, you can enter the corresponding parameters manually. You should verify the port number that the service needs. • You can add multiple virtual server rules if you want to provide several services in a router. Please note that the External Port should not be overlapped.
Chapter 4 1. Visit http://tplinkwifi.net, and log in with password you set for the router. 2. Go to Advanced > NAT Forwarding > Port Triggering and click Add. 3. Click View Existing Applications, and select the desired application. The External Port, Internal Port and Protocol will be automatically filled in. The following picture takes application MSN Gaming Zone as an example. 4. Click OK. Tips: • You can add multiple port triggering rules according to your network need.
Chapter 4 Note: When DMZ is enabled, the DMZ host is totally exposed to the Internet, which may bring some potential safety hazards. If DMZ is not in use, please disable it in time. Make the home PC join the Internet online game without port restriction. I want to: For example, due to some port restriction, when playing the online games, you can login normally but cannot join a team with other players. To solve this problem, set your PC as a DMZ host with all ports open. How can I do that? 1.
Chapter 4 Tips: • UPnP is enabled by default in this router. • Only the application supporting UPnP protocol can use this feature. • UPnP feature needs the support of operating system (e.g. Windows Vista/ Windows 7/ Windows 8, etc. Some of operating system need to install the UPnP components).
Chapter 4 4. 6. 1. Use OpenVPN to Access Your Home Network In the OpenVPN connection, the home network can act as a server, and the remote device can access the server through the router which acts as an OpenVPN Server gateway. To use the VPN feature, you should enable OpenVPN Server on your router, and install and run VPN client software on the remote device. Please follow the steps below to set up an OpenVPN connection. Step1. Set up OpenVPN Server on Your Router 1. Visit http://tplinkwifi.
Chapter 4 8. Click Generate to get a new certificate. Note: If you have already generated one, please skip this step, or click Generate to update the certificate. 9. Click Export to save the OpenVPN configuration file which will be used by the remote device to access your router. Step 2. Configure OpenVPN Connection on Your Remote Device 1. Visit http://openvpn.net/index.php/download/community-downloads.
Chapter 4 Note: Before you enable VPN Server, we recommend you configure Dynamic DNS Service (recommended) or assign a static IP address for router’s WAN port and synchronize your System Time with Internet. 3. In the Client IP Address filed, enter the range of IP addresses (up to 10) that can be leased to the devices by the PPTP VPN server. 4. Click Advanced to set the PPTP connection permission according to your needs.
Chapter 4 Step 2. Configure PPTP VPN Connection on Your Remote Device The remote device can use the Windows built-in PPTP software or a third-party PPTP software to connect to PPTP Server. Here we use the Windows built-in PPTP software as an example. 1. Go to Start > Control Panel > Network and Internet > Network and Sharing Center. 2. Select Set up a new connection or network. 3. Select Connect to a workplace and click Next.
Chapter 4 4. Select Use my Internet connection (VPN). 5. Enter the Internet IP address of the router (for example: 218.18.1.73) in the Internet address field. Click Next. 6. Enter the User name and Password you have set for the PPTP VPN server on your router, and click Connect.
Chapter 4 7. The PPTP VPN connection is created and ready to use.
Chapter 4 4. 7. Customize Your Network Settings 4. 7. 1. Change the LAN Settings The router is preset with a default LAN IP 192.168.0.1, which you can use to log in to its web management page. The LAN IP address together with the Subnet Mask also defines the subnet that the connected devices are on. If the IP address conflicts with another device on your local network or your network requires a specific IP subnet, you can change it. 1. Visit http://tplinkwifi.
Chapter 4 • LACP passive: enables LACP only when an LACP device is detected. 5. Specify two ports for link aggregation. 6. Click Save. 4. 7. 3. Configure to Support IPTV Service I want to: Configure IPTV setup to enable Internet/IPTV/Phone service provided by my Internet Service Provider (ISP). How can I do that? 1. Visit http://tplinkwifi.net, and log in with password you set for the router. 2. Go to Advanced > Network > IPTV. 3.
Chapter 4 • Select Bridge if your ISP is not listed and no other parameters are required. • Select Custom if your ISP is not listed but provides necessary parameters. 3 ) After you have selected a mode, the necessary parameters, including the LAN port for IPTV connection, are predetermined. If not, select the LAN type to determine which port is used to support IPTV service. 4 ) Click Save.
Chapter 4 • To specify the IP address that the router assigns: 1. Check the box for Enable DHCP Server. 2. Enter the starting and ending IP addresses in the IP Address Pool. 3. Enter other parameters if the ISP offers. The Default Gateway is automatically filled in and is the same as the LAN IP address of the router. 4. Click Save. • To reserve an IP address for a specified client device: 1. Click Add in the Address Reservation section. 2.
Chapter 4 4. 7. 5. Set Up a Dynamic DNS Service Account Most ISPs assign a dynamic IP address to the router and you can use this IP address to access your router remotely. However, the IP address can change any time and you don’t know when it changes. In this case, you might apply the DDNS (Dynamic Domain Name Server) feature on the router to allow you and your friends to access your router and local servers (FTP, HTTP, etc.) using domain name without checking and remembering the IP address.
Chapter 4 the following figure so that the physical connection between my PC and my company’s server is established. To surf the Internet and visit my company’s network at the same time, I need to configure the static routing. Router A Company’s server Router B WAN: 172.30.30.100 LAN: 192.168.0.1 LAN: 192.168.0.2 172.30.30.1 Switch PC 192.168.0.100 How can I do that? 1. Change the routers’ LAN IP addresses to two different IP addresses on the same subnet. Disable Router B’s DHCP function. 2.
Chapter 4 subnet with the WAN IP or LAN IP of Router A. In the example, the IP address of the company network is the destination IP address, so here enter 172.30.30.1. Subnet Mask: Determines the destination network with the destination IP address. If the destination is a single IP address, enter 255.255.255.255; otherwise, enter the subnet mask of the corresponding network IP. In the example, the destination network is a single IP, so here enter 255.255.255.255.
Chapter 4 2. The wireless radio is enabled by default. If you want to disable the wireless function of the router, just uncheck the box for Enable Wireless Radio. In this case, all the wireless settings will be invalid. • To change the wireless network name (SSID) and wireless password: 1. Go to Basic > Wireless. 2. Create a new SSID in Network Name (SSID) and customize the password for the network in Password. The value is case-sensitive.
Chapter 4 • Channel Width - Select a channel width (bandwidth) for the wireless network. • Channel - Select an operating channel for the wireless network. It is recommended to leave the channel to Auto, if you are not experiencing the intermittent wireless connection issue. • Transmit Power - Select either High, Middle or Low to specify the data transmit power. The default and recommended setting is High. 4. 7. 8.
Chapter 4 4. 7. 9. Schedule Your Wireless Function The wireless network can be automatically off at a specific time when you do not need the wireless connection. 1. Visit http://tplinkwifi.net, and log in with password you set for the router. 2. Go to Advanced > Wireless > Wireless Schedule. 3. Select 2.4GHz, 5GHz-1 or 5GHz-2 to change the corresponding settings. 4. Enable the Wireless Schedule feature. 5. Click the icon to set the Effective Time.
Chapter 4 Note: • The Effective Time Schedule is based on the time of the router. You can go to Advanced > System Tools > Time Settings to modify the time. • The wireless LED will be off if the corresponding wireless network is disabled. • The wireless network will be automatically turned on after the time period you set. 4. 8. Manage the Router 4. 8. 1. Adjust Wi-Fi Coverage You can set the extender’s Wi-Fi coverage depending on how large you want your Wi-Fi area to be. 1.
Chapter 4 2. Select your local Time Zone from the drop-down list. 3. In the NTP Server I fileld, enter the IP address or domain name of your desired NTP Server. 4. (Optional) In the NTP Server II fileld, enter the IP address or domain name of the second NTP Server. 5. Click Obtain to get the current Internet time and click Save. • To manually set the date and time: 1. In the Set Time field, select Manually. 2. Set the current Date (In MM/DD/YYYY format). 3. Set the current Time (In HH/MM/SS format).
Chapter 4 2. Select the correct Start date and time when daylight saving time starts at your local time zone. 3. Select the correct End date and time when daylight saving time ends at your local time zone. 4. Click Save. 4. 8. 3. Test the Network Connectivity Diagnostics is used to test the connectivity between the router and the host or other network devices. 1. Visit http://tplinkwifi.net, and log in with password you set for the router. 2. Go to Advanced > System Tools > Diagnostics. 3.
Chapter 4 The figure below indicates the proper connection between the router and the Yahoo server (www.Yahoo.com) tested through Traceroute. 4. 8. 4. Upgrade the Firmware TP-LINK aims at providing better network experience for users. We will inform you throught the web management page if there’s any update firmware available for your router. Also, the latest firmware will be released at the TP-LINK official website www.tp-link.com, and you can download it from the Support page for free.
Chapter 4 3. Focus on the Online Upgrade section, and click Upgrade. 4. Wait a few minutes for the upgrade and reboot to complete. Tips: If there’s a new and important firmware update for your router, you will see the notification (similar as shown below) on your computer as long as a web browser is opened. Click Upgrade now, and log into the web management page with the username and password you set for the router. You will see the Firmware Upgrade page. Manual Upgrade 1.
Chapter 4 2. Connect your computer to the router with an Ethernet cable. 3. Visit 192.168.0.1 and you will see the following upgrade page. 4. Click Browse and select the downloaded firmware file. 5. Click Upgrade and wait for a few minutes until the router completes the upgrading and restarts. 4. 8. 5. Backup and Restore Configuration Settings The configuration settings are stored as a configuration file in the router.
Chapter 4 1. Click Factory Restore to reset the router. 2. Wait a few minutes for the resetting and rebooting. Note: • During the resetting process, do not turn off or reset the router. • We strongly recommend you backup the current configuration settings before resetting the router. 4. 8. 6. Change the Administrator Account The account management feature allows you to change your login username and password of the web management page. 1. Visit http://tplinkwifi.
Chapter 4 4. 8. 7. Password Recovery This feature allows you to recover your default login username and password in case you forget them. 1. Visit http://tplinkwifi.net, and log in with password you set for the router. 2. Go to Advanced > System Tools > Administration and focus on the Password Recovery section. 3. Check the box for Enable Password Recovery. 4. Specify a mailbox (From) for sending the recovery letter and enter its SMTP Server address.
Chapter 4 4. 8. 8. Local Management This feature allows you to limit the number of client devices on your LAN from accessing the router by using the MAC address-based authentication. 1. Visit http://tplinkwifi.net, and log in with password you set for the router. 2. Go to Advanced > System Tools > Administration and complete the settings In Local Management section according to your needs. • Allow all LAN connected devices to manage the router: Toggle on Access for All LAN Connected Devices.
Chapter 4 4. 8. 9. Remote Management This feature allows you to control remote devices’ authority to manage the router. 1. Visit http://tplinkwifi.net, and log in with password you set for the router. 2. Go to Advanced > System Tools > Administration and complete the settings in Remote Management section according to your needs. • Forbid all devices to manage the router remotely: Select Disable Remote Management and click Save.
Chapter 4 4. 8. 10. System Log When the router does not work properly, you can save the system log and send it to the technical support for troubleshooting. • To Save the System Log in Local: 1. Visit http://tplinkwifi.net, and log in with password you set for the router. 2. Go to Advanced > System Tools > System Log. 3. Choose the type and level of the system logs according to your need. 4. Click Save Log to save the system logs to local.
Chapter 4 1 ) From: Enter the email address used for sending the system log. 2 ) To: Enter the recipient’s email address, which can be the same as or different from the sender’s email address. 3 ) SMTP Server: Enter the SMTP server address. Tips: SMTP server is available for users in most webmail systems. For example, the SMTP server address of Hotmail is smtp-mail.outlook.com. You can refer to their Help page to learn the SMTP server address. 4 ) Select Enable Authentication.
Chapter 4 Click Refresh to update the statistic information on the page. Click Reset All to reset all statistic values in the list to zero. Click Delete All to delete all statistic information in the list. Click Click to reset the statistic information of the specific device. to delete the specific device item in the list. 4. 8. 12. Control LEDs The router‘s LEDs indicate router’s activities and status.
Chapter 5 Configure the Router in Access Point Mode This chapter presents how to configure the various features of the router working as an Access Point.
Chapter 5 5. 1. Change the working mode 1. Visit http://tplinkwifi.net, and log in with the password you set for the router. 2. Click Mode button in the top-right corner of the page, select Access Point and click Save. 5. 2. Guest Network 5. 2. 1. Create a Network for Guests This function allows you to provide Wi-Fi access for guests without disclosing your main network. When you have guests in your house, apartment, or workplace, you can create a guest network for them.
Chapter 5 • If No security is selected, no password is needed to access your guest network. • If WAP/WPA2-Personal is selected, keep the default Version and Encryption values, and customize your own password. 4. Click Save. Now your guests can access your guest network using the SSID and password you set! Tips: To view guest network information, go to Settings > Status and locate the Guest Network section. 5. 2. 2. Customize Guest Network Options 1. Visit http://tplinkwifi.
Chapter 5 5. 3. Parental controls This function allows you to block inappropriate, explicit and malicious websites, and control access to specified websites at specified time. I want to: Control the times of day my children or other home network users are allowed to access the Internet and even types of websites they can visit. For example, I want to allow my children’s devices (e.g. a computer or a tablet) to access only www.tp-link.com and Wikipedia.
Chapter 5 5. Enter a Description for the entry, check the box for Enable This Entry, and then click OK. 6. Select Whitelist as the restriction policy. Tips: • With Blacklist selected, the controlled devices cannot access any websites containing the specified keywords during the Internet Access Time period. • With Whitelist selected, the controlled devices can only access websites containing the specified keywords during the Internet Access Time period. 7. Click . Enter a website and click Save.
Chapter 5 Now you can control your children’s Internet access as needed. Done! 5. 4. Customize your wireless setting 5. 4. 1. Specify Wireless Settings The router’s wireless network name (SSID) and password, and security option are preset in the factory. The preset SSID and password can be found on the label of the router. You can customize the wireless settings according to your needs. Visit http://tplinkwifi.net, and log in with password you set for the router.
Chapter 5 5. 4. 2. Use WPS for Wireless Connection Wi-Fi Protected Setup (WPS) provides an easier approach to set up a security-protected Wi-Fi connection. 1. Visit http://tplinkwifi.net, and log in with password you set for the router. 2. Go to Settings > Wireless > WPS . Use the WPS button Click WPS start button on the page, and immediately tap the WPS button on your WPSsupported devices such as Android phones, tablets or most network cards within two minutes.
Chapter 5 • PIN (Personal Identification Number) is an eight-character identification number preset to each router. WPS supported devices can connect to your router with the PIN. The default PIN is printed on the label of the router. Use the Client’s PIN Enter the client’s PIN in the field, and click Connect. 3. Success will appear on the above screen and the WPS LED on the router will keep on for five minutes if the client has been successfully added to the network. 5. 5.
Chapter 5 5. Click Save. 5. 5. 2. Adjust Wi-Fi Coverage You can set the extender’s Wi-Fi coverage depending on how large you want your Wi-Fi area to be. 1. Visit http://tplinkwifi.net and log in with the password you set for the extender. 2. Go to Settings > Advanced Settings > Wi-Fi Coverage. 3. Select Min, Mid or Max to adjust your Wi-Fi coverage of the extender. 4. Click Save. 5. 5. 3.
Chapter 5 2. Select the device to be blocked in the Online Devices table by ticking the corresponding checkbox. 3. Click Block and the selected device(s) will be added to the Devices in Blacklist table. 4. Click in the Devices in Blacklist table to set the Effective Time for a certain entry as needed. 5. Click OK. ¾¾ To permit specific device(s): 1. Select Whitelist and click Save. 2. Click Add in the Devices in Whitelist table. Enter the Device Name and MAC Address.
Chapter 5 3. Click OK. 5. 6. Manage the Router 5. 6. 1. Set Up System Time The System Time of the extender will be used for time-based functions such as the Power Schedule function. If you have enabled the Daylight Saving Time feature, the system time will be sychronized with the daylight saving time you configure. 4. Visit http://tplinkwifi.net, and log in with the password you set for the extender. 5. Go to Settings > System Tools > Time Settings. ¾¾ To get system time: 1.
Chapter 5 1. Select Enable Daylight Saving Time. 2. Select the Start and End date and time of the daylight saving time at your local time zone. 3. Click Save. 5. 6. 2. Control LEDs The LEDs of the extender indicate its activities and status. You can enable the Night Mode feature to specify a time period during which the LEDs are off. 1. Visit http://tplinkwifi.net, and log in with the password you set for the extender. 2. Go to Settings > System Tools > LED Control.
Chapter 5 ¾¾ To specify a time period when the extender is off: 1. Select Enable Power Schedule. 2. Specify a time period in the Power-Off Time field and days in the Day(s) field, and the extender will be off during this period. 3. Click Save. 5. 6. 4. Upgrade the Firmware TP-LINK is committed to improving product features, giving you a better network experience. You can download the latest firmware file from the Support page at our website www.tp-link.
Chapter 5 3. Focus on the Online Upgrade section, and click Upgrade. 4. Wait a few minutes for the firmware upgrade to complete and the router to reboot. ¾¾ To upgrade the firmware locally: 1. Download the www.tp-link.com. latest firmware file for the extender from our website 2. Visit http://tplinkwifi.net, and log in with the password you set for the extender. 3. Go to Settings > System Tools > Firmware Upgrade. 4.
Chapter 5 ¾¾ To restore configuration settings: 1. Click Browse to locate the backup configuration file stored on your computer, and click Restore. 2. Wait a few minutes for the restore and reboot. Note: During the restore process, do not power off or reset the extender. ¾¾ To reset the extender to factory default settings: 1. Click Factory Restore to reset the extender. 2. Wait a few minutes for the reset and reboot. Note: 1. During the reset process, do not power off or reset the router. 2.
Chapter 5 5. 6. 7. System Log If the extender is not working normally, you can save the system log and send it to our technical support team. 1. Visit http://tplinkwifi.net, and log in with the password you set for the extender. 2. Go to Settings > System Tools > System Log. ¾¾ To Save the system log locally: 1. Choose the type and level of the system log as needed. 2. Click Save Log to save the system logs to a local disk.
Chapter 6 Configure the Router in Range Extender Mode This chapter presents how to configure the various features of the router working as a Range Extender.
Chapter 6 6. 1. Change the working mode 1. Visit http://tplinkwifi.net, and log in with the password you set for the router. 2. Click Mode button in the top-right corner of the page, select Range Extender and click Save. 6. 2. Guest Network 6. 2. 1. Create a Network for Guests This function allows you to provide Wi-Fi access for guests without disclosing your main network. When you have guests in your house, apartment, or workplace, you can create a guest network for them.
Chapter 6 • If WAP/WPA2-Personal is selected, keep the default Version and Encryption values, and customize your own password. 4. Click Save. Now your guests can access your guest network using the SSID and password you set! 6. 2. 2. Customize Guest Network Options 1. Visit http://tplinkwifi.net, and log in with password you set for the router. 2. Go to Settings > Guest Network. Locate the Settings section. 3. Customize guest network options according to your needs.
Chapter 6 For example, I want to allow my children’s devices (e.g. a computer or a tablet) to access only www.tp-link.com and Wikipedia.org from 18:00 (6PM) to 22:00 (10PM) at the weekend and not other times. How can I do that? 1. Visit http://tplinkwifi.net, and log in with password you set for the router. 2. Go to Settings > Parental Controls and enable Parental Controls. 3. Click Add. And then Click View Existing Devices, and select the access device.
Chapter 6 5. Enter a Description for the entry, check the box for Enable This Entry, and then click OK. 6. Select Whitelist as the restriction policy. Tips: • With Blacklist selected, the controlled devices cannot access any websites containing the specified keywords during the Internet Access Time period. • With Whitelist selected, the controlled devices can only access websites containing the specified keywords during the Internet Access Time period. 7. Click . Enter a website and click Save.
Chapter 6 Now you can control your children’s Internet access as needed. Done! 6. 4. Customize your wireless setting 6. 4. 1. Specify Wireless Settings The router’s wireless network name (SSID) and password, and security option are preset in the factory. The preset SSID and password can be found on the label of the router. You can customize the wireless settings according to your needs. Visit http://tplinkwifi.net, and log in with password you set for the router.
Chapter 6 6. 4. 2. Use WPS for Wireless Connection Wi-Fi Protected Setup (WPS) provides an easier approach to set up a security-protected Wi-Fi connection. 1. Visit http://tplinkwifi.net, and log in with password you set for the router. 2. Go to Settings > Wireless > WPS . Use the WPS button Click WPS start button on the page, and immediately tap the WPS button on your WPSsupported devices such as Android phones, tablets or most network cards within two minutes.
Chapter 6 Use the Client’s PIN Enter the client’s PIN in the field, and click Connect. 3. Success will appear on the above screen and the WPS LED on the router will keep on for five minutes if the client has been successfully added to the network. 6. 5. Customize Your Network 6. 5. 1. Change LAN Settings The extender is preset with a default LAN IP 192.168.0.254, with which you can log in to the web management page.
Chapter 6 6. 5. 2. Specify DHCP Server Settings By default, the DHCP (Dynamic Host Configuration Protocol) Server is enabled and the extender acts as a DHCP server; it dynamically assigns TCP/IP parameters to client devices from the IP Address Pool. You can change the settings of the DHCP Server if necessary. 1. Visit http://tplinkwifi .net, and log in with the password you set for the extender. 2. Go to Settings > Network > DHCP Server. ¾¾ To specify the IP address that the extender assigns: 1.
Chapter 6 6. 5. 3. Adjust Wi-Fi Coverage You can set the extender’s Wi-Fi coverage depending on how large you want your Wi-Fi area to be. 1. Visit http://tplinkwifi.net and log in with the password you set for the extender. 2. Go to Settings > Advanced Settings > Wi-Fi Coverage. 3. Select Min, Mid or Max to adjust your Wi-Fi coverage of the extender. 4. Click Save. 6. 5. 4.
Chapter 6 2. Select the device to be blocked in the Online Devices table by ticking the corresponding checkbox. 3. Click Block and the selected device(s) will be added to the Devices in Blacklist table. 4. Click in the Devices in Blacklist table to set the Effective Time for a certain entry as needed. 5. Click OK. ¾¾ To permit specific device(s): 1. Select Whitelist and click Save. 2. Click Add in the Devices in Whitelist table. Enter the Device Name and MAC Address.
Chapter 6 3. Click OK. 6. 6. Manage the Router 6. 6. 1. Set Up System Time The System Time of the extender will be used for time-based functions such as the Power Schedule function. If you have enabled the Daylight Saving Time feature, the system time will be sychronized with the daylight saving time you configure. 4. Visit http://tplinkwifi .net, and log in with the password you set for the extender. 5. Go to Settings > System Tools > Time Settings. ¾¾ To get system time: 1.
Chapter 6 2. Select the Start and End date and time of the daylight saving time at your local time zone. 3. Click Save. 6. 6. 2. Control LEDs The LEDs of the extender indicate its activities and status. You can enable the Night Mode feature to specify a time period during which the LEDs are off. 1. Visit http://tplinkwifi .net, and log in with the password you set for the extender. 2. Go to Settings > System Tools > LED Control. ¾¾ To specify a time period when LEDs are off: 1. Select Night Mode.
Chapter 6 6. 6. 3. Upgrade the Firmware TP-LINK is committed to improving product features, giving you a better network experience. You can download the latest firmware file from the Support page at our website www.tp-link.com and upgrade the firmware to the latest version. Note: 1. Make sure the latest firmware file is matched with the hardware version (as shown in the download section of the Support page). 2. Make sure that you have a stable connection between the extender and your computer.
Chapter 6 5. Wait a few minutes for the firmware upgrade to complete and the router to reboot. 6. 6. 4. Backup and Restore Configuration Settings The configuration settings are stored as a configuration file in the extender. You can backup the configuration file and restore the extender to the previous settings from the backup file when needed. Moreover, if necessary, you can erase the current settings and reset the extender to the default factory settings. 1. Visit http://tplinkwifi .
Chapter 6 2. Wait a few minutes for the reset and reboot. Note: 1. During the reset process, do not power off or reset the router. 2. We strongly recommend you backup the current configuration settings before resetting the extender. 6. 6. 5. Change Login Password The account management feature allows you to change your login password of the management web page. 1. Visit http://tplinkwifi .net, and log in with the password you set for the extender. 2. Go to Settings > System Tools > Administration.
Chapter 6 92
FAQ Q1. What can I do if I forgot my wireless password? The default wireless password is printed on the label of the router. If the password has been altered, please connect your computer to the router using an Ethernet cable and follow the steps below: 1. Visit http://tplinkwifi.net, and log in with the username and password you set for the router. 2. Go to Wireless > Wireless Security to retrieve or reset your wireless password. Q2.
3 ) Click LAN settings and deselect the following three options, and click OK.
4 ) Go to Advanced > Restore advanced settings, and click OK to save the settings. • Use another web browser or computer to log in again. • Reset the router to factory default settings and try again. If the login still fails, please contact the technical support. Note: You’ll need to reconfigure the router to surf the Internet once the router is reset. Q4. How to use the WDS Bridging function to extend my wireless network? For example, my house covers a large area.
2 ) Click Save. Note: Log in to the web management page again if the IP address of the router is altered. 3. Survey the SSID to be bridged: 1 ) Go to Wireless > Wireless Settings and click Enable WDS Bridging. 2 ) Click Survey, locate the root router’s SSID and click Choose (Here we take TP-LINK_2512 as example). 3 ) If the root router is set with a wireless password, you should enter the wireless password of the root router. 4 ) Click Save. 4.
Q5. What can I do if I cannot access the Internet even though the configuration is finished? 1. Visit http://tplinkwifi.net, and log in to with the username and password you set for the router. 2. Go to Status to check WAN status: If IP Address is a valid one, please try the methods below and try again: • Your computer might not recognize any DNS server addresses, please manually configure DNS server. 1 ) Go to DHCP. 2 ) Enter 8.8.8.8 as Primary DNS, and click Save. Tips: 8.8.8.
1 ) Visit http://tplinkwifi.net, and log in with the username and password you set for the router. 2 ) Go to Network > MAC Clone, select Clone MAC Address and click Save. • • Tips: Some ISP will register the MAC address of your computer when you access the Internet for the first time through their Cable modem, if you add a router into your network to share your Internet connection, the ISP will not accept it as the MAC address is changed, so we need to clone your computer’s MAC address to the router.
• Double check the Internet Connection Type. 1 ) Confirm your Internet Connection Type, which can be learned from the ISP. 2 ) Visit http://tplinkwifi.net, and log in with the username and password you set for the router. 3 ) Go to Network > WAN. 4 ) Select your WAN Connection Type and fill in other parameters. 5 ) Click Save. 6 ) Restart the modem and the router. • Please upgrade the firmware of the router.
• On Windows 7 1 ) If you see the message No connections are available, it is usually because the wireless function is disabled or blocked somehow. 2 ) Clicking Troubleshoot and windows might be able to fix the problem by itself. • On Windows XP 1 ) If you see the message Windows cannot configure this wireless connection, this is usually because windows configuration utility is disabled or you are running another wireless configuration tool to connect the wireless.
2 ) If you cannot find the PIN or PIN failed, you may choose Connecting using a security key instead, and then type in the Wireless Password/Network Security Key. 3 ) If it continues to show note of Network Security Key Mismatch, it is suggested to confirm the wireless password of your wireless router. Note: Wireless Password/Network Security Key is case sensitive.
COPYRIGHT & TRADEMARKS Specifications are subject to change without notice. is a registered trademark of TP-LINK TECHNOLOGIES CO., LTD. Other brands and product names are trademarks or registered trademarks of their respective holders. No part of the specifications may be reproduced in any form or by any means or used to make any derivative such as translation, transformation, or adaptation without permission from TP-LINK TECHNOLOGIES CO., LTD. Copyright © 2016 TP-LINK TECHNOLOGIES CO., LTD.
FCC STATEMENT This equipment has been tested and found to comply with the limits for a Class B digital device, pursuant to part 15 of the FCC Rules. These limits are designed to provide reasonable protection against harmful interference in a residential installation. This equipment generates, uses and can radiate radio frequency energy and, if not installed and used in accordance with the instructions, may cause harmful interference to radio communications.
CE Mark Warning This is a class B product. In a domestic environment, this product may cause radio interference, in which case the user may be required to take adequate measures. RF Exposure Information This device meets the EU requirements (1999/5/EC Article 3.1a) on the limitation of exposure of the general public to electromagnetic fields by way of health protection. The device complies with RF specifications when the device used at 20 cm from your body.
Caution: 1. The device for operation in the band 5150–5250 MHz is only for indoor use to reduce the potential for harmful interference to co-channel mobile satellite systems; 2. For devices with detachable antenna(s), the maximum antenna gain permitted for devices in the bands 5250-5350 MHz and 5470-5725 MHz shall be such that the equipment still complies with the e.i.r.p. limit; 3.
Déclaration d’exposition aux radiations: Cet équipement est conforme aux limites d’exposition aux rayonnements IC établies pour un environnement non contrôlé. Cet équipement doit être installé et utilisé avec un minimum de 20 cm de distance entre la source de rayonnement et votre corps. Industry Canada Statement CAN ICES-3 (B)/NMB-3(B) Korea Warning Statements: 당해 무선설비는 운용중 전파혼신 가능성이 있음.
Safety Information • When product has power button, the power button is one of the way to shut off the product; when there is no power button, the only way to completely shut off power is to disconnect the product or the power adapter from the power source. • Don’t disassemble the product, or make repairs yourself. You run the risk of electric shock and voiding the limited warranty. If you need service, please contact us. • Avoid water and wet locations.