
User's Manual
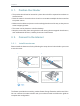


Table Of Contents
- About This Guide
- Get to Know About Your Router
- Connect to the Internet
- Log in
- Configure the router in Standard Wireless Router
- 4. 1. Guest Network
- 4. 2. Parental controls
- 4. 3. QoS
- 4. 4. Network Security
- 4. 5. NAT Forwarding
- 4. 6. VPN Server
- 4. 7. Customize Your Network Settings
- 4. 7. 1. Change the LAN Settings
- 4. 7. 2. Set Up Link Aggregation
- 4. 7. 3. Configure to Support IPTV Service
- 4. 7. 4. Specify DHCP Server Settings
- 4. 7. 5. Set Up a Dynamic DNS Service Account
- 4. 7. 6. Create Static Routes
- 4. 7. 7. Specify Wireless Settings
- 4. 7. 8. Use WPS for Wireless Connection
- 4. 7. 9. Schedule Your Wireless Function
- 4. 8. Manage the Router
- 4. 8. 1. Adjust Wi-Fi Coverage
- 4. 8. 2. Set Up System Time
- 4. 8. 3. Test the Network Connectivity
- 4. 8. 4. Upgrade the Firmware
- 4. 8. 5. Backup and Restore Configuration Settings
- 4. 8. 6. Change the Administrator Account
- 4. 8. 7. Password Recovery
- 4. 8. 8. Local Management
- 4. 8. 9. Remote Management
- 4. 8. 10. System Log
- 4. 8. 11. Monitor the Internet Traffic Statistics
- 4. 8. 12. Control LEDs
- Configure the Router in Access Point Mode
- Configure the Router in Range Extender Mode
- FAQ

10
Chapter 2
Note:
If the above screen does not pop-up, it means that your IE Web-browser has been set to a proxy. Go to Tools menu >
Internet Options > Connections > LAN Settings, in the screen that appears, cancel the Using Proxy checkbox, and click
OK to finish it.
4. After successfully login, follow Quick Setup to complete the configuration.
5. Enjoy! For wireless devices, you may have to reconnect to the wireless network if you
have customized the SSID (wireless name) and password during the configuration.
2. 2. 3. Range Extender Mode
This mode boosts your home wireless coverage.
1. Configure:Using RE Button is an easy way to extend your host network. We
recommend you to use this way if your host router has the WPS button. The button
might look like these:
WPS
• Option One: Using RE Button
1 ) Press the WPS button on the host router.
2 ) Press and hold the RE button on the top panel of router for about 3 seconds within 1
minute. The router will start to reboot.
3 ) After rebooted, the RE LED should change from blinking to a solid state, indicating a
successful connection.
Note: If not, please refer to the Option Two.
• Option Two: Using Web Browser
1 ) Connect a computer to the router via an Ethernet cable or wirelessly by using the SSID
(wireless name) and password printed on the bottom label of the router.
2 ) Enter http://tplinkwifi.net in the address bar of a web browser. Use admin for both
username and password, and then click Login.