
User's Manual
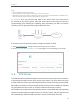
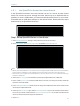


Table Of Contents
- About This Guide
- Get to Know About Your Router
- Connect to the Internet
- Log in
- Configure the router in Standard Wireless Router
- 4. 1. Guest Network
- 4. 2. Parental controls
- 4. 3. QoS
- 4. 4. Network Security
- 4. 5. NAT Forwarding
- 4. 6. VPN Server
- 4. 7. Customize Your Network Settings
- 4. 7. 1. Change the LAN Settings
- 4. 7. 2. Set Up Link Aggregation
- 4. 7. 3. Configure to Support IPTV Service
- 4. 7. 4. Specify DHCP Server Settings
- 4. 7. 5. Set Up a Dynamic DNS Service Account
- 4. 7. 6. Create Static Routes
- 4. 7. 7. Specify Wireless Settings
- 4. 7. 8. Use WPS for Wireless Connection
- 4. 7. 9. Schedule Your Wireless Function
- 4. 8. Manage the Router
- 4. 8. 1. Adjust Wi-Fi Coverage
- 4. 8. 2. Set Up System Time
- 4. 8. 3. Test the Network Connectivity
- 4. 8. 4. Upgrade the Firmware
- 4. 8. 5. Backup and Restore Configuration Settings
- 4. 8. 6. Change the Administrator Account
- 4. 8. 7. Password Recovery
- 4. 8. 8. Local Management
- 4. 8. 9. Remote Management
- 4. 8. 10. System Log
- 4. 8. 11. Monitor the Internet Traffic Statistics
- 4. 8. 12. Control LEDs
- Configure the Router in Access Point Mode
- Configure the Router in Range Extender Mode
- FAQ

28
Chapter 4
1. Visit http://tplinkwifi.net, and log in with password you set for the router.
2. Go to Advanced > NAT Forwarding > Port Triggering and click Add.
3. Click View Existing Applications, and select the desired application. The External Port, Internal
Port and Protocol will be automatically filled in. The following picture takes application MSN
Gaming Zone as an example.
4. Click OK.
Tips:
• You can add multiple port triggering rules according to your network need.
• The triggering ports can not be overlapped.
• If the application you need is not listed in the Existing Applications list, please enter the parameters
manually. You should verify the external ports the application uses first and enter them into External Port
field according to the format the page displays.
4. 5. 3. Make Applications Free from Port Restriction by DMZ
When a PC is set to be a DMZ (Demilitarized Zone) host on the local network, it is totally
exposed to the Internet, which can realize the unlimited bidirectional communication
between internal hosts and external hosts. The DMZ host becomes a virtual server with
all ports opened. When you are not clear about which ports to open in some special
applications, such as IP camera and database software, you can set the PC to be a DMZ
host.