
User's Manual

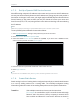

Table Of Contents
- About This Guide
- Get to Know About Your Router
- Connect to the Internet
- Log in
- Configure the router in Standard Wireless Router
- 4. 1. Guest Network
- 4. 2. Parental controls
- 4. 3. QoS
- 4. 4. Network Security
- 4. 5. NAT Forwarding
- 4. 6. VPN Server
- 4. 7. Customize Your Network Settings
- 4. 7. 1. Change the LAN Settings
- 4. 7. 2. Set Up Link Aggregation
- 4. 7. 3. Configure to Support IPTV Service
- 4. 7. 4. Specify DHCP Server Settings
- 4. 7. 5. Set Up a Dynamic DNS Service Account
- 4. 7. 6. Create Static Routes
- 4. 7. 7. Specify Wireless Settings
- 4. 7. 8. Use WPS for Wireless Connection
- 4. 7. 9. Schedule Your Wireless Function
- 4. 8. Manage the Router
- 4. 8. 1. Adjust Wi-Fi Coverage
- 4. 8. 2. Set Up System Time
- 4. 8. 3. Test the Network Connectivity
- 4. 8. 4. Upgrade the Firmware
- 4. 8. 5. Backup and Restore Configuration Settings
- 4. 8. 6. Change the Administrator Account
- 4. 8. 7. Password Recovery
- 4. 8. 8. Local Management
- 4. 8. 9. Remote Management
- 4. 8. 10. System Log
- 4. 8. 11. Monitor the Internet Traffic Statistics
- 4. 8. 12. Control LEDs
- Configure the Router in Access Point Mode
- Configure the Router in Range Extender Mode
- FAQ

41
Chapter 4
4. 7. 5. Set Up a Dynamic DNS Service Account
Most ISPs assign a dynamic IP address to the router and you can use this IP address to
access your router remotely. However, the IP address can change any time and you don’t
know when it changes. In this case, you might apply the DDNS (Dynamic Domain Name
Server) feature on the router to allow you and your friends to access your router and
local servers (FTP, HTTP, etc.) using domain name without checking and remembering
the IP address.
Note:
DDNS does not work if the ISP assigns a private WAN IP address (such as 192.168.1.x) to the router.
To set up DDNS, please follow the instructions below:
1. Visit http://tplinkwifi.net, and log in with password you set for the router.
2. Go to Advanced > Network > Dynamic DNS.
3. Select the DDNS Service Provider (NO-IP or DynDNS). If you don’t have a DDNS account,
select a service provider and click Go to register.
4. Enter the username, password and domain name of the account.
5. Click Login and Save.
Tips:
If you want to use a new DDNS account, please logout first, and then login with the new account.
4. 7. 6. Create Static Routes
Static routing is a form of routing that is configured manually by a network administrator
or a user by adding entries into a routing table. The manually-configured routing
information guides the router in forwarding data packets to the specific destination.
Visit multiple networks and servers at the same time.
For example, in a small office, my PC can surf the Internet through
Router A, but I also want to visit my company’s network. Now I
have a switch and Router B. I connect the devices as shown in
I want to: