
User's Manual
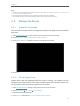
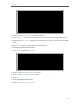
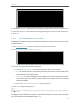

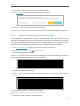


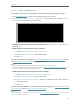
Table Of Contents
- About This Guide
- Get to Know About Your Router
- Connect to the Internet
- Log in
- Configure the router in Standard Wireless Router
- 4. 1. Guest Network
- 4. 2. Parental controls
- 4. 3. QoS
- 4. 4. Network Security
- 4. 5. NAT Forwarding
- 4. 6. VPN Server
- 4. 7. Customize Your Network Settings
- 4. 7. 1. Change the LAN Settings
- 4. 7. 2. Set Up Link Aggregation
- 4. 7. 3. Configure to Support IPTV Service
- 4. 7. 4. Specify DHCP Server Settings
- 4. 7. 5. Set Up a Dynamic DNS Service Account
- 4. 7. 6. Create Static Routes
- 4. 7. 7. Specify Wireless Settings
- 4. 7. 8. Use WPS for Wireless Connection
- 4. 7. 9. Schedule Your Wireless Function
- 4. 8. Manage the Router
- 4. 8. 1. Adjust Wi-Fi Coverage
- 4. 8. 2. Set Up System Time
- 4. 8. 3. Test the Network Connectivity
- 4. 8. 4. Upgrade the Firmware
- 4. 8. 5. Backup and Restore Configuration Settings
- 4. 8. 6. Change the Administrator Account
- 4. 8. 7. Password Recovery
- 4. 8. 8. Local Management
- 4. 8. 9. Remote Management
- 4. 8. 10. System Log
- 4. 8. 11. Monitor the Internet Traffic Statistics
- 4. 8. 12. Control LEDs
- Configure the Router in Access Point Mode
- Configure the Router in Range Extender Mode
- FAQ

53
Chapter 4
1. Click Factory Restore to reset the router.
2. Wait a few minutes for the resetting and rebooting.
Note:
• During the resetting process, do not turn off or reset the router.
• We strongly recommend you backup the current configuration settings before resetting the router.
4. 8. 6. Change the Administrator Account
The account management feature allows you to change your login username and
password of the web management page.
1. Visit http://tplinkwifi.net, and log in with password you set for the router.
2. Go to Advanced > System Tools > Administration and focus on the Account Management
section.
3. Enter the old username and old password, then a new username and a new password twice
(both case-sensitive). Click Save.
4. Use the new username and password for the following logins.