
User's Manual


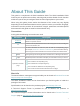
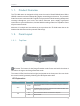
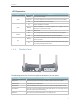
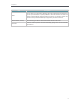
Table Of Contents
- About This Guide
- Get to Know About Your Router
- Connect to the Internet
- Log in
- Configure the router in Standard Wireless Router
- 4. 1. Guest Network
- 4. 2. Parental controls
- 4. 3. QoS
- 4. 4. Network Security
- 4. 5. NAT Forwarding
- 4. 6. VPN Server
- 4. 7. Customize Your Network Settings
- 4. 7. 1. Change the LAN Settings
- 4. 7. 2. Set Up Link Aggregation
- 4. 7. 3. Configure to Support IPTV Service
- 4. 7. 4. Specify DHCP Server Settings
- 4. 7. 5. Set Up a Dynamic DNS Service Account
- 4. 7. 6. Create Static Routes
- 4. 7. 7. Specify Wireless Settings
- 4. 7. 8. Use WPS for Wireless Connection
- 4. 7. 9. Schedule Your Wireless Function
- 4. 8. Manage the Router
- 4. 8. 1. Adjust Wi-Fi Coverage
- 4. 8. 2. Set Up System Time
- 4. 8. 3. Test the Network Connectivity
- 4. 8. 4. Upgrade the Firmware
- 4. 8. 5. Backup and Restore Configuration Settings
- 4. 8. 6. Change the Administrator Account
- 4. 8. 7. Password Recovery
- 4. 8. 8. Local Management
- 4. 8. 9. Remote Management
- 4. 8. 10. System Log
- 4. 8. 11. Monitor the Internet Traffic Statistics
- 4. 8. 12. Control LEDs
- Configure the Router in Access Point Mode
- Configure the Router in Range Extender Mode
- FAQ

3
Chapter 1
1. 1. Product Overview
The TP-LINK router is designed to fully meet the need of Small Office/Home Office
(SOHO) networks and users demanding higher networking performance. The powerful
antennas ensure continuous Wi-Fi signal to all your devices while boosting widespread
coverage throughout your home, the built-in Ethernet ports supply high-speed
connection to your wired devices, and the flexible working modes are capable to meet
all your network needs.
Moreover, it is simple and convenient to set up and use the TP-LINK router due to its
intuitive web interface and the powerful Tether app.
1. 2. Panel Layout
1. 2. 1. Top View
WPS RE
LAN
WAN
PWR
2.4G
5G
RE button: The button for the Range Extender mode. Press and hold it for about 3
seconds to change to the Range Extender mode.
The router’s LEDs (view from left to right) are located on the front panel. You can check
the router’s working status by following the LED Explanation table.
LED Explanation
Name Status Indication
WPS
On/Off
Turns on when WPS connection is established, and goes off about 5
minutes later.
Blinking
A wireless device is trying to connect to the network via WPS. This
process may take up to 2 minutes.
LAN
On There is at least one device connects to the LAN ports.
Off No connection.