
User's Manual Part 1

33
Chapter 6
USB Application
1. Visit http://tplinkwifi.net, then log in with the username and password you set for the
router.
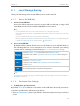
2. Go to Advanced > USB Settings > Sharing Access. Focus on the Sharing Account section.
3. Choose to use the default Account (admin) or use a new account and click Save.
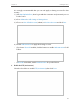
4. Enable Authentication to apply the account you just set.
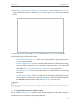
• If you leave Share All enabled, click the button to enable Authentication for all
folders.
• If Share All is disabled, enable Authentication for specific folders.
¾ To Customize the Address of the USB Disk
You can customize the server name and use the name to access your USB disk.
1. Visit http://tplinkwifi.net, then log in with the username and password you set for the
router.
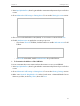
2. Go to Advanced > USB Settings > Sharing Access. Focus on the Sharing Settings section
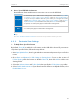
3. Make sure Network Neighborhood is ticked, and enter a Network/Media Server
Name as you like, such as My-Share, then click Save.