
User's Manual
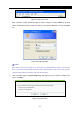
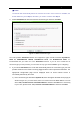
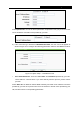
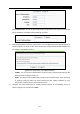
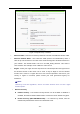
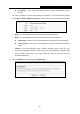
Table Of Contents
- Package Contents
- Chapter 1. Introduction
- Chapter 2. Connecting the router
- Chapter 3. Quick Installation Guide
- Chapter 4. Configuring the router
- 4.1 Login
- 4.2 Status
- 4.3 Quick Setup
- 4.4 Network
- 4.5 Dual Band Selection
- 4.6 Wireless 2.4GHz
- 4.7 Wireless 5GHz
- 4.8 Guest Network
- 4.9 DHCP
- 4.10 USB Settings
- 4.11 NAT
- 4.12 Forwarding
- 4.13 Security
- 4.14 Parental Control
- 4.15 Access Control
- 4.16 Advanced Routing
- 4.17 Bandwidth Control
- 4.18 IP & MAC Binding
- 4.19 Dynamic DNS
- 4.20 IPv6 Support
- 4.21 System Tools
- Appendix A: FAQ
- Appendix B: Configuring the PCs
- Appendix C: Specifications
- Appendix D: Glossary

Archer C5
AC1200 Wireless Dual Band Gigabit Router
- 12 -
Note:
The Router will automatically detect the Internet connection. If the Internet is available, the
Router will direct you to Step 5; otherwise, you need to continue with Step 3.
3. Select Auto-Detect to detect the Internet connection type and then click Next.
Figure 3-6 WAN Connection Type
The router provides Auto-Detect function and supports five types of WAN connection: Dynamic IP,
Static IP, PPPoE/Russian PPPoE, L2TP/Russian L2TP, and PPTP/Russian PPTP. It’s
recommended that you make use of the Auto-Detect function. If you are sure of what kind of
connection type your ISP provides, you can select the very type and click Next to go on configuring.
4. If you select Auto-Detect, the router will automatically detect the connection type your ISP
provides. Make sure the cable is securely plugged into the Internet port before detection. The
appropriate configuration page will be displayed when an active Internet service is
successfully detected by the router.
1) If the connection type detected is Dynamic IP, there will appear the MAC Clone page (as
shown in Figure 3-7). In most cases, there is no need to clone the MAC address. You can
select “No, I do NOT need to clone MAC address” and then click Next. If it is necessary
in your case, please select “Yes, I need to clone MAC address” and then click Next.