
User's Manual
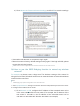
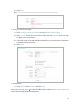
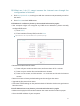
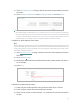

Table Of Contents
- About This Guide
- Get to Know About Your Router
- Connect to the Internet
- Login
- Configure the router
- 4. 1. Status
- 4. 2. Network
- 4. 3. Dual Band Selection
- 4. 4. Wireless(2.4Ghz or 5Ghz)
- 4. 5. Guest Network
- 4. 6. DHCP
- 4. 7. Forwarding
- 4. 8. Security
- 4. 9. Parental Controls
- 4. 10. Access Control
- 4. 11. Advanced Routing
- 4. 12. Bandwidth Control
- 4. 13. IP&MAC Binding
- 4. 14. Dynamic DNS
- 4. 15. IPv6
- 4. 16. System Tools
- 4. 17. Logout
- FAQ

69
2 ) Click Save.
Note: Log in to the web management page again if the IP address of the router is altered.
3. Survey the SSID to be bridged:
1 ) Go to Wireless > Wireless Settings and click Enable WDS Bridging.
2 ) Click Survey, locate the root router’s SSID and click Choose (Here we take
TP-LINK_2512 as example).
3 ) If the root router is set with a wireless password, you should enter the wireless
password of the root router.
4 ) Click Save.
4. Disable DHCP:
1 ) Go to DHCP, select Disable, and click Save.
Now you can go to Status to check the WDS status. When the WDS status is Run, it
means WDS bridging is successfully built.