
User's Manual

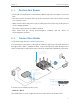
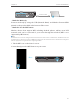


Table Of Contents
- About This Guide
- Get to Know About You Router
- Connect the Hardware
- Log into Your Router
- Set Up Internet Connections
- Guest Network
- USB Application
- Parental Controls
- QoS (Quality of Service)
- Network Security
- NAT Forwarding
- VPN Server
- Customize Your Network Settings
- Manage the Router
- 13. 1. Set Up System Time
- 13. 2. Test the Network Connectivity
- 13. 3. Upgrade the Firmware
- 13. 4. Backup and Restore Configuration Settings
- 13. 5. Change the Administrator Account
- 13. 6. Password Recovery
- 13. 7. Local Management
- 13. 8. Remote Management
- 13. 9. System Log
- 13. 10. Monitor the Internet Traffic Statistics
- 13. 11. Control LEDs
- FAQ
- Specifications

10
Chapter 2
Connect the Hardware
Ethernet cable
• Method 2: Wirelessly
Connect wirelessly by using the SSID (Network Name) and Wireless Password/PIN
printed on the product label at the bottom of the router.
• Method 3: Use the WPS button
Wireless devices that support WPS, including Android phones, tablets, most USB
network cards, can be connected to your router through this method. (WPS is not
supported by IOS devices.)
Note:
The WPS function cannot be configured if the wireless function of the router is disabled. Also, the WPS function will
be disabled if your wireless encryption is WEP. Please make sure the wireless function is enabled and is configured
with the appropriate encryption before configuring the WPS.
1. Tab the WPS icon on the device’s screen.
2. Immediately press the WPS button on your router.
Close