
User's Manual


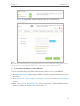


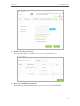
Table Of Contents
- About This Guide
- Get to Know About You Router
- Connect the Hardware
- Log into Your Router
- Set Up Internet Connections
- Guest Network
- USB Application
- Parental Controls
- QoS (Quality of Service)
- Network Security
- NAT Forwarding
- VPN Server
- Customize Your Network Settings
- Manage the Router
- 13. 1. Set Up System Time
- 13. 2. Test the Network Connectivity
- 13. 3. Upgrade the Firmware
- 13. 4. Backup and Restore Configuration Settings
- 13. 5. Change the Administrator Account
- 13. 6. Password Recovery
- 13. 7. Local Management
- 13. 8. Remote Management
- 13. 9. System Log
- 13. 10. Monitor the Internet Traffic Statistics
- 13. 11. Control LEDs
- FAQ
- Specifications

30
Chapter 6
USB Application
Windows
computer
¾ Method 2:
Open the Windows Explorer (or go to Computer) and type the server
address \\tplinkwifi.net or ftp://tplinkwifi.net in the address bar, then
press [Enter].
Mac
1 ) Select Go > Connect to Server
2 ) Type the server address smb://tplinkwifi.net
3 ) Click Connect.
4 ) When prompted, select the Guest radio box. (If you have set up
a username and a password to deny anonymous access to the
USB disks, you should select the Registered User radio box. To
learn how to set up an account for the access, refer to To Set up
Authentication for Data Security.)
Pad
Use a third-party app for network files management.
Tips:
You can also access your USB disk by using your Network/Media Server Name as the server address. Refer to To
Customize the Address of the USB Disk to learn more.