
User's Manual


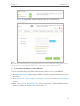


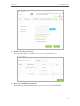
Table Of Contents
- About This Guide
- Get to Know About You Router
- Connect the Hardware
- Log into Your Router
- Set Up Internet Connections
- Guest Network
- USB Application
- Parental Controls
- QoS (Quality of Service)
- Network Security
- NAT Forwarding
- VPN Server
- Customize Your Network Settings
- Manage the Router
- 13. 1. Set Up System Time
- 13. 2. Test the Network Connectivity
- 13. 3. Upgrade the Firmware
- 13. 4. Backup and Restore Configuration Settings
- 13. 5. Change the Administrator Account
- 13. 6. Password Recovery
- 13. 7. Local Management
- 13. 8. Remote Management
- 13. 9. System Log
- 13. 10. Monitor the Internet Traffic Statistics
- 13. 11. Control LEDs
- FAQ
- Specifications

32
Chapter 6
USB Application
• Enable Media Sharing: If you tick this check box, you can view photos, play
music and watch movies in the folder directly from DLNA-supported devices.
Refer to Media Sharing to learn more.
6. Click OK.
Tips:
The router can share 32 volumes at most. You can click on the page to detach the corresponding volume you do
not need to share.
¾ To Set up Authentication for Data Security
If you enable Authentication, network clients will be required to enter the username
and password you set when accessing the USB disk.
1. Visit http://tplinkwifi.net, then log in with the username and password you’ve set for
the router.
2. Go to Advanced > USB Settings > Sharing Access. Focus on the Sharing Account
section.
3. Choose Use Default Account (admin) or Use New Account and click Save.
4. Enable Authentication to apply the account you just set.
• If you leave Share All enabled, click the button to enable Authentication for all
folders.