
User's Manual
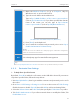
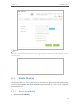
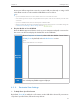
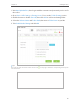


Table Of Contents
- About This Guide
- Get to Know About You Router
- Connect the Hardware
- Log into Your Router
- Set Up Internet Connections
- Guest Network
- USB Application
- Parental Controls
- QoS (Quality of Service)
- Network Security
- NAT Forwarding
- VPN Server
- Customize Your Network Settings
- Manage the Router
- 13. 1. Set Up System Time
- 13. 2. Test the Network Connectivity
- 13. 3. Upgrade the Firmware
- 13. 4. Backup and Restore Configuration Settings
- 13. 5. Change the Administrator Account
- 13. 6. Password Recovery
- 13. 7. Local Management
- 13. 8. Remote Management
- 13. 9. System Log
- 13. 10. Monitor the Internet Traffic Statistics
- 13. 11. Control LEDs
- FAQ
- Specifications

40
Chapter 6
USB Application
1. Visit http://tplinkwifi.net, then log in with the username and password you’ve set for
the router.
2. Go to Basic > USB Settings > Sharing Access. Focus on the Folder Sharing section.
3. Click the button to disable Share All, then click Add to add a new sharing folder.
4. Select the Volume Name and Folder Path, then enter a Folder Name as you like.
5. Tick Enable Media Sharing and click OK.
Tips:
The router can share 32 volumes at most. You can click on the page to detach the corresponding volume you do
not need to share.