
User's Manual


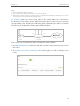
Table Of Contents
- About This Guide
- Get to Know About You Router
- Connect the Hardware
- Log into Your Router
- Set Up Internet Connections
- Guest Network
- USB Application
- Parental Controls
- QoS (Quality of Service)
- Network Security
- NAT Forwarding
- VPN Server
- Customize Your Network Settings
- Manage the Router
- 13. 1. Set Up System Time
- 13. 2. Test the Network Connectivity
- 13. 3. Upgrade the Firmware
- 13. 4. Backup and Restore Configuration Settings
- 13. 5. Change the Administrator Account
- 13. 6. Password Recovery
- 13. 7. Local Management
- 13. 8. Remote Management
- 13. 9. System Log
- 13. 10. Monitor the Internet Traffic Statistics
- 13. 11. Control LEDs
- FAQ
- Specifications

62
Chapter 10
NAT Forwarding
10. 1. Share Local Resources in the Internet by Virtual
Server
When you build up a server in the local network and want to share it on the Internet,
Virtual Server can realize the service and provide it to the Internet users. At the same
time virtual server can keep the local network safe as other services are still invisible
from the Internet.
Virtual server can be used for setting up public services in your local network, such as
HTTP, FTP, DNS, POP3/SMTP and Telnet. Different service uses different service port.
Port 80 is used in HTTP service, port 21 in FTP service, port 25 in SMTP service and port
110 in POP3 service. Please verify the service port number before the configuration.
Share my personal website I’ve built in local network with my
friends through the Internet.
For example, the personal website has been built in my home
PC (192.168.0.100). I hope that my friends in the Internet can
visit my website in some way. The PC is connected to the router
with the WAN IP address 218.18.232.154.
Router
WAN: 218.18.232.154
LAN
Home
Personal Website
1. Assign a static IP address to your PC, for example
192.168.0.100.
2. Visit http://tplinkwifi.net, and log in with the username and
password you‘ve set for the router.
3. Go to Advanced > NAT Forwarding > Virtual Servers.
4. Click Add. Click View Existing Services and select HTTP. The
external port, internal port and protocol will be automatically
filled with contents. Enter the PC’s IP address 192.168.0.100
in the Internal IP field.
5. Click OK to save the settings.
I want to:
How can I
do that?