
User's Guide
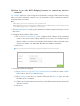

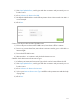
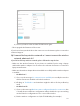
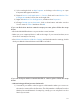

Table Of Contents
- About This Guide
- Get to Know About Your Router
- Connect the Hardware
- Log into Your Router
- Set Up Internet Connection
- Guest Network
- USB Application
- Parental Controls
- QoS
- Network Security
- NAT Forwarding
- VPN Server
- Customize Your Network Settings
- Manage the Router
- 13. 1. Set Up System Time
- 13. 2. Test the Network Connectivity
- 13. 3. Upgrade the Firmware
- 13. 4. Backup and Restore Configuration Settings
- 13. 5. Change the Administrator Account
- 13. 6. Password Recovery
- 13. 7. Local Management
- 13. 8. Remote Management
- 13. 9. System Log
- 13. 10. Monitor the Internet Traffic Statistics
- 13. 11. Control LEDs
- FAQ

99
• Your computer might not recognize any DNS server addresses, please manually
configure DNS server.
1 ) Go to Advanced > Network > DHCP Server.
2 ) Enter 8.8.8.8 as Primary DNS, click Save.
Tips: 8.8.8.8 is a safe and public DNS server operated by Google.
• Power cycle the modem and the TP-LINK router.
1 ) Power off your modem and TP-LINK router, leave them off for 1 minute.
2 ) Power on your modem first, wait about 2 minutes until it gets a solid cable or
Internet light.
3 ) Power back TP-LINK router.
4 ) Wait another 1 or 2 minutes and check the Internet access.
• Reset the router to factory default settings and reconfigure the router.
• Upgrade the firmware of the router.
• Check the TCP/IP settings on the particular device if all other devices can get Internet
from the router.
As the picture below shows, if the IP Address is 0.0.0.0, please try the methods below
and try again: