
User's Guide
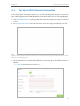

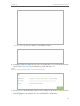
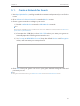
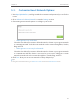
Table Of Contents
- About This Guide
- Get to Know About Your Router
- Connect the Hardware
- Log into Your Router
- Set Up Internet Connection
- Guest Network
- USB Application
- Parental Controls
- QoS
- Network Security
- NAT Forwarding
- VPN Server
- Customize Your Network Settings
- Manage the Router
- 13. 1. Set Up System Time
- 13. 2. Test the Network Connectivity
- 13. 3. Upgrade the Firmware
- 13. 4. Backup and Restore Configuration Settings
- 13. 5. Change the Administrator Account
- 13. 6. Password Recovery
- 13. 7. Local Management
- 13. 8. Remote Management
- 13. 9. System Log
- 13. 10. Monitor the Internet Traffic Statistics
- 13. 11. Control LEDs
- FAQ

19
Chapter 4
Set Up Internet Connection
5 ) Pass-Through (Bridge): Click Save and skip to step 6.
4. Configure LAN ports. Windows users are recommended to choose from the first two
types. Fill in Address Prefix provided by your ISP, and click Save.
Tips:
Find Help on the management interface to know more about items.
5. Click Status to check whether you have successfully set up an IPv6 connection. The
following figure is an example of a successful PPPoE configuration.