
User's Guide
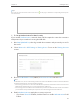
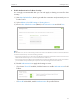
Table Of Contents
- About This Guide
- Get to Know About Your Router
- Connect the Hardware
- Log into Your Router
- Set Up Internet Connection
- Guest Network
- USB Application
- Parental Controls
- QoS
- Network Security
- NAT Forwarding
- VPN Server
- Customize Your Network Settings
- Manage the Router
- 13. 1. Set Up System Time
- 13. 2. Test the Network Connectivity
- 13. 3. Upgrade the Firmware
- 13. 4. Backup and Restore Configuration Settings
- 13. 5. Change the Administrator Account
- 13. 6. Password Recovery
- 13. 7. Local Management
- 13. 8. Remote Management
- 13. 9. System Log
- 13. 10. Monitor the Internet Traffic Statistics
- 13. 11. Control LEDs
- FAQ

33
Chapter 6
USB Application
Computer
1 ) Open the Windows Explorer (or go to Computer, only for
Windows users) or open a web browser.
2 ) Type the server address in the address bar:
Type in ftp://<WAN IP address of the router>:<port number>
(such as ftp://59.40.2.243:21). If you have specified the domain
name of the router, you can also type in ftp://<domain
name>:<port number> (such as ftp://MyDomainName:21)
The Address Bar the Windows Explorer (Windows 7)
3 ) Press [Enter] on the keyboard.
4 ) Access with the username and password you set in Step 2
Enable Authentication for Data Security.
Tips:
You can also access the USB disk via a third-party app for network files management,
which can resume broken file transfers.
Pad Use a third-party app for network files management.
Tips:
Click Set Up a Dynamic DNS Service Account to learn how to set up a domain name for you router.
6. 2. 2. Customize Your Settings
¾ To Only Share Specific Content
By default, Share All is enabled so all content on the USB disk is shared. If you want to
only share specific folders, follow the steps below:
1. Visit http://tplinkwifi.net, then log in with the username and password you set for
the router.
2. Select Basic > USB Settings > Sharing Access. Focus on the Folder Sharing section.
Click the button to disable Share All, then click Add to add a new sharing folder.