
User's Guide
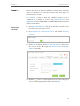
Table Of Contents
- About This Guide
- Get to Know About Your Router
- Connect the Hardware
- Log into Your Router
- Set Up Internet Connection
- Guest Network
- USB Application
- Parental Controls
- QoS
- Network Security
- NAT Forwarding
- VPN Server
- Customize Your Network Settings
- Manage the Router
- 13. 1. Set Up System Time
- 13. 2. Test the Network Connectivity
- 13. 3. Upgrade the Firmware
- 13. 4. Backup and Restore Configuration Settings
- 13. 5. Change the Administrator Account
- 13. 6. Password Recovery
- 13. 7. Local Management
- 13. 8. Remote Management
- 13. 9. System Log
- 13. 10. Monitor the Internet Traffic Statistics
- 13. 11. Control LEDs
- FAQ

37
Chapter 6
USB Application
6. 4. Printer Sharing
The Printer Sharing feature helps you share a printer with different computers connected
to the router.
Note:
Printers unlisted on this page may be incompatible with the router:
http://www.tp-link.com/common/compatible/print-server/.
1. Install the Driver of the Printer
Make sure you have installed the driver of the printer on each computer that needs
printer service.
If you do not have the driver, contact the printer manufacturer.
2. Connect the Printer
Cable a printer to the USB port with the USB cable. Wait several seconds until the
USB LED becomes solid on.
3. Install the TP-LINK USB Printer Controller Utility
TP-LINK USB Printer Controller Utility helps you access the shared printer. Download
and Install the utility on each computer that needs printer service.
1 ) Visit http://www.tp-link.com/app/usb/.
2 ) Click PC Utility (for Windows users) or Mac Utility to download the installation
file and uncompress it.