
User's Guide
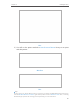
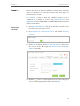
Table Of Contents
- About This Guide
- Get to Know About Your Router
- Connect the Hardware
- Log into Your Router
- Set Up Internet Connection
- Guest Network
- USB Application
- Parental Controls
- QoS
- Network Security
- NAT Forwarding
- VPN Server
- Customize Your Network Settings
- Manage the Router
- 13. 1. Set Up System Time
- 13. 2. Test the Network Connectivity
- 13. 3. Upgrade the Firmware
- 13. 4. Backup and Restore Configuration Settings
- 13. 5. Change the Administrator Account
- 13. 6. Password Recovery
- 13. 7. Local Management
- 13. 8. Remote Management
- 13. 9. System Log
- 13. 10. Monitor the Internet Traffic Statistics
- 13. 11. Control LEDs
- FAQ

38
Chapter 6
USB Application
3 ) Open the uncompressed folder, then click TP-LINK USB Printer Controller Setup
(for Windows users) or TP-Link UDS Printer Controller Installer (for Mac users) to
install the utility.
4. Access the Printer
You should set the shared printer as Auto-Connect Printer on every computer that
needs printer service.
1 ) Double-click the icon on your desktop to launch the USB Printer Controller.
2 ) Highlight the printer you share.
Windows
Mac
3 ) Click the Auto-Connect for printing tab to pull down a list, then select Set Auto-
Connect Printer.
Windows