
User's Guide

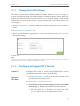
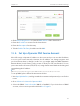

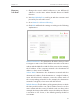
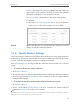
Table Of Contents
- About This Guide
- Get to Know About Your Router
- Connect the Hardware
- Log into Your Router
- Set Up Internet Connection
- Guest Network
- USB Application
- Parental Controls
- QoS
- Network Security
- NAT Forwarding
- VPN Server
- Customize Your Network Settings
- Manage the Router
- 13. 1. Set Up System Time
- 13. 2. Test the Network Connectivity
- 13. 3. Upgrade the Firmware
- 13. 4. Backup and Restore Configuration Settings
- 13. 5. Change the Administrator Account
- 13. 6. Password Recovery
- 13. 7. Local Management
- 13. 8. Remote Management
- 13. 9. System Log
- 13. 10. Monitor the Internet Traffic Statistics
- 13. 11. Control LEDs
- FAQ

71
Chapter 12
Customize Your Network Settings
2 ) Click Save.
3 ) After configuring IGMP proxy, IPTV can work behind your
router now. You can connect your set-top box to any of
the router’s Ethernet port.
If IGMP is not the technology your ISP applies to provide
IPTV service:
1 ) Tick Enable IPTV.
2 ) Select the appropriate Mode according to your ISP.
• Select Bridge if your ISP is not listed and no other
parameters are required, and then skip to Step 4.
• Select Custom if your ISP is not listed but provides
necessary parameters.
3 ) After you have selected a mode, the necessary parameters
are predetermined. You can perform other configuration,
e.g. enter the IPTV Multicast VLAN ID and select the IPTV
Multicast VLAN Priority in Russia mode according to your
ISP.
4 ) For Russia, Singapore-ExStream, Malaysia-Unifi and
Malaysia-Maxis mode, connect the set-top box to the
predetermined LAN port. For Bridge and Custom mode,
select the LAN type and connect the set-top box to the
corresponding port.
5 ) Click Save.
Your IPTV setup is done now! You may need to configure your
set-top box before enjoying your TV.
Tips
Qos and IPTV cannot be enabled at the same time.
Done!