
User's Guide
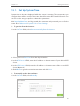

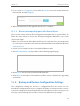


Table Of Contents
- About This Guide
- Get to Know About Your Router
- Connect the Hardware
- Log into Your Router
- Set Up Internet Connection
- Guest Network
- USB Application
- Parental Controls
- QoS
- Network Security
- NAT Forwarding
- VPN Server
- Customize Your Network Settings
- Manage the Router
- 13. 1. Set Up System Time
- 13. 2. Test the Network Connectivity
- 13. 3. Upgrade the Firmware
- 13. 4. Backup and Restore Configuration Settings
- 13. 5. Change the Administrator Account
- 13. 6. Password Recovery
- 13. 7. Local Management
- 13. 8. Remote Management
- 13. 9. System Log
- 13. 10. Monitor the Internet Traffic Statistics
- 13. 11. Control LEDs
- FAQ

83
Chapter 13
Manage the Router
13. 3. 1. Online Upgrade
1. Visit http://tplinkwifi.net, and log in with the username and password you’ve set for
the router.
2. When the latest firmware is available for your router, the update icon will display
in the top-right corner of the page. Click the icon to go to the Firmware Upgrade
page.
Alternatively, you can go to Advanced > System Tools > Firmware Upgrade, and click
Check for upgrade to see whether the latest firmware is released.
3. Focus on the Online Upgrade section, and click Upgrade.
4. Wait a few moments for the upgrade and reboot to complete.
Tips:
If there’s a new and important firmware update for your router, you will see the notification (similar as shown below)
on your computer as long as a web browser is opened. Click Upgrade now, and log into the web management page
with the username and password you set for the router. You will see the Firmware Upgrade page.
13. 3. 2. Local Upgrade
1. Download the latest firmware file for the router from www.tp-link.com.
2. Visit http://tplinkwifi.net, and log in with the username and password you set for the
router.
3. Go to Advanced > System Tools > Firmware Upgrade.
4. Focus on the Device Information section. Make sure the downloaded firmware file is
matched with the Hardware Version.