
User's Manual
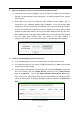

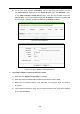
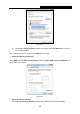
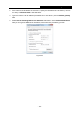
Table Of Contents
- Package Contents
- Chapter 1. Introduction
- Chapter 2. Connecting the Router
- Chapter 3. Quick Installation Guide
- Chapter 4. Configuring the Router
- 4.1 Login
- 4.2 Status
- 4.3 Quick Setup
- 4.4 Network
- 4.5 Dual Band Selection
- 4.6 Wireless 2.4GHz
- 4.7 Wireless 5GHz
- 4.8 Guest Network
- 4.9 DHCP
- 4.10 USB Settings
- 4.11 NAT
- 4.12 Forwarding
- 4.13 Security
- 4.14 Parental Control
- 4.15 Access Control
- 4.16 Advanced Routing
- 4.17 Bandwidth Control
- 4.18 IP & MAC Binding
- 4.19 Dynamic DNS
- 4.20 IPv6 Support
- 4.21 System Tools
- 4.22 Logout
- Appendix A: FAQ
- Appendix B: Configuring the PC
- Appendix C: Specifications
- Appendix D: Glossary

Archer C7
AC1750 Wireless Dual Band Gigabit Router
- 125 -
Appendix B: Configuring the PC
In this section, we’ll introduce how to install and configure the TCP/IP correctly in Windows 7. First
make sure your Ethernet Adapter is working, refer to the adapter’s manual if needed.
1. Install TCP/IP component
1) On the Windows taskbar, click the Start button, and then click Control Panel.
2) Click the Network and Internet, and click the Network and Sharing Center, then click
Change adapter settings.
3) Right click the icon that showed below, select Properties on the prompt page.
Figure B-1
4) In the prompt page that showed below, double click on the Internet Protocol Version 4
(TCP/IPv4).