
User's Manual
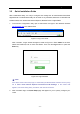
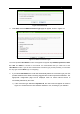
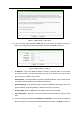
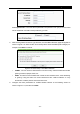
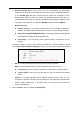
Table Of Contents
- 组合 2
- Archer C7_User Manual
- Package Contents
- Chapter 1. Introduction
- Chapter 2. Connecting the Router
- Chapter 3. Quick Installation Guide
- Chapter 4. Configuring the Router
- 4.1 Login
- 4.2 Status
- 4.3 Quick Setup
- 4.4 Network
- 4.5 Dual Band Selection
- 4.6 Wireless 2.4GHz
- 4.7 Wireless 5GHz
- 4.8 Guest Network
- 4.9 DHCP
- 4.10 USB Settings
- 4.11 NAT
- 4.12 Forwarding
- 4.13 Security
- 4.14 Parental Control
- 4.15 Access Control
- 4.16 Advanced Routing
- 4.17 Bandwidth Control
- 4.18 IP & MAC Binding
- 4.19 Dynamic DNS
- 4.20 IPv6 Support
- 4.21 System Tools
- 4.22 Logout
- Appendix A: FAQ
- Appendix B: Configuring the PC
- Appendix C: Specifications
- Appendix D: Glossary
- C7
- 95
- Archer C7_User Manual
- Package Contents
- Chapter 1. Introduction
- Chapter 2. Connecting the Router
- Chapter 3. Quick Installation Guide
- Chapter 4. Configuring the Router
- 4.1 Login
- 4.2 Status
- 4.3 Quick Setup
- 4.4 Network
- 4.5 Dual Band Selection
- 4.6 Wireless 2.4GHz
- 4.7 Wireless 5GHz
- 4.8 Guest Network
- 4.9 DHCP
- 4.10 USB Settings
- 4.11 NAT
- 4.12 Forwarding
- 4.13 Security
- 4.14 Parental Control
- 4.15 Access Control
- 4.16 Advanced Routing
- 4.17 Bandwidth Control
- 4.18 IP & MAC Binding
- 4.19 Dynamic DNS
- 4.20 IPv6 Support
- 4.21 System Tools
- 4.22 Logout
- Appendix A: FAQ
- Appendix B: Configuring the PC
- Appendix C: Specifications
- Appendix D: Glossary
- Archer C7_User Manual
- 95
- 组合 2
- Archer C7_User Manual
- Package Contents
- Chapter 1. Introduction
- Chapter 2. Connecting the Router
- Chapter 3. Quick Installation Guide
- Chapter 4. Configuring the Router
- 4.1 Login
- 4.2 Status
- 4.3 Quick Setup
- 4.4 Network
- 4.5 Dual Band Selection
- 4.6 Wireless 2.4GHz
- 4.7 Wireless 5GHz
- 4.8 Guest Network
- 4.9 DHCP
- 4.10 USB Settings
- 4.11 NAT
- 4.12 Forwarding
- 4.13 Security
- 4.14 Parental Control
- 4.15 Access Control
- 4.16 Advanced Routing
- 4.17 Bandwidth Control
- 4.18 IP & MAC Binding
- 4.19 Dynamic DNS
- 4.20 IPv6 Support
- 4.21 System Tools
- 4.22 Logout
- Appendix A: FAQ
- Appendix B: Configuring the PC
- Appendix C: Specifications
- Appendix D: Glossary
- C7
- 95
- Archer C7_User Manual
- Package Contents
- Chapter 1. Introduction
- Chapter 2. Connecting the Router
- Chapter 3. Quick Installation Guide
- Chapter 4. Configuring the Router
- 4.1 Login
- 4.2 Status
- 4.3 Quick Setup
- 4.4 Network
- 4.5 Dual Band Selection
- 4.6 Wireless 2.4GHz
- 4.7 Wireless 5GHz
- 4.8 Guest Network
- 4.9 DHCP
- 4.10 USB Settings
- 4.11 NAT
- 4.12 Forwarding
- 4.13 Security
- 4.14 Parental Control
- 4.15 Access Control
- 4.16 Advanced Routing
- 4.17 Bandwidth Control
- 4.18 IP & MAC Binding
- 4.19 Dynamic DNS
- 4.20 IPv6 Support
- 4.21 System Tools
- 4.22 Logout
- Appendix A: FAQ
- Appendix B: Configuring the PC
- Appendix C: Specifications
- Appendix D: Glossary
- Archer C7_User Manual

Archer C7
AC1750 Wireless Dual Band Gigabit Router
- 17 -
Figure 3-13 Quick Setup – Wireless
Wireless Radio - Indicates whether the wireless radio feature of the Router is enabled
or disabled.
Wireless Network Name - Enter a string of up to 32 characters. The same Name
(SSID) must be assigned to all wireless devices in your network. The default SSID is set
to be TP-LINK_xxxx (xxxx indicates the last unique four characters of each Router's
MAC address), which can ensure your wireless network security. But it is recommended
strongly that you change your networks name (SSID) to a different value. This value is
case-sensitive. For example, MYSSID is NOT the same as MySsid.
Wireless Security
Disable Security - The wireless security function can be enabled or disabled. If
disabled, the wireless stations will be able to connect the router without encryption.
Enable Security (WPA-PSK/WPA2-PSK) - It’s selected by default, with the default
PSK password the same as the default PIN code.
No Change - If you chose this option, wireless security configuration will not
change!
The above settings are only for basic wireless parameters. For advanced settings, please
check “More Advanced Wireless Settings”, and then you can set the following parameters.