
User's Manual
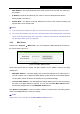
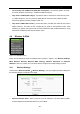
Table Of Contents
- 组合 2
- Archer C7_User Manual
- Package Contents
- Chapter 1. Introduction
- Chapter 2. Connecting the Router
- Chapter 3. Quick Installation Guide
- Chapter 4. Configuring the Router
- 4.1 Login
- 4.2 Status
- 4.3 Quick Setup
- 4.4 Network
- 4.5 Dual Band Selection
- 4.6 Wireless 2.4GHz
- 4.7 Wireless 5GHz
- 4.8 Guest Network
- 4.9 DHCP
- 4.10 USB Settings
- 4.11 NAT
- 4.12 Forwarding
- 4.13 Security
- 4.14 Parental Control
- 4.15 Access Control
- 4.16 Advanced Routing
- 4.17 Bandwidth Control
- 4.18 IP & MAC Binding
- 4.19 Dynamic DNS
- 4.20 IPv6 Support
- 4.21 System Tools
- 4.22 Logout
- Appendix A: FAQ
- Appendix B: Configuring the PC
- Appendix C: Specifications
- Appendix D: Glossary
- C7
- 95
- Archer C7_User Manual
- Package Contents
- Chapter 1. Introduction
- Chapter 2. Connecting the Router
- Chapter 3. Quick Installation Guide
- Chapter 4. Configuring the Router
- 4.1 Login
- 4.2 Status
- 4.3 Quick Setup
- 4.4 Network
- 4.5 Dual Band Selection
- 4.6 Wireless 2.4GHz
- 4.7 Wireless 5GHz
- 4.8 Guest Network
- 4.9 DHCP
- 4.10 USB Settings
- 4.11 NAT
- 4.12 Forwarding
- 4.13 Security
- 4.14 Parental Control
- 4.15 Access Control
- 4.16 Advanced Routing
- 4.17 Bandwidth Control
- 4.18 IP & MAC Binding
- 4.19 Dynamic DNS
- 4.20 IPv6 Support
- 4.21 System Tools
- 4.22 Logout
- Appendix A: FAQ
- Appendix B: Configuring the PC
- Appendix C: Specifications
- Appendix D: Glossary
- Archer C7_User Manual
- 95
- 组合 2
- Archer C7_User Manual
- Package Contents
- Chapter 1. Introduction
- Chapter 2. Connecting the Router
- Chapter 3. Quick Installation Guide
- Chapter 4. Configuring the Router
- 4.1 Login
- 4.2 Status
- 4.3 Quick Setup
- 4.4 Network
- 4.5 Dual Band Selection
- 4.6 Wireless 2.4GHz
- 4.7 Wireless 5GHz
- 4.8 Guest Network
- 4.9 DHCP
- 4.10 USB Settings
- 4.11 NAT
- 4.12 Forwarding
- 4.13 Security
- 4.14 Parental Control
- 4.15 Access Control
- 4.16 Advanced Routing
- 4.17 Bandwidth Control
- 4.18 IP & MAC Binding
- 4.19 Dynamic DNS
- 4.20 IPv6 Support
- 4.21 System Tools
- 4.22 Logout
- Appendix A: FAQ
- Appendix B: Configuring the PC
- Appendix C: Specifications
- Appendix D: Glossary
- C7
- 95
- Archer C7_User Manual
- Package Contents
- Chapter 1. Introduction
- Chapter 2. Connecting the Router
- Chapter 3. Quick Installation Guide
- Chapter 4. Configuring the Router
- 4.1 Login
- 4.2 Status
- 4.3 Quick Setup
- 4.4 Network
- 4.5 Dual Band Selection
- 4.6 Wireless 2.4GHz
- 4.7 Wireless 5GHz
- 4.8 Guest Network
- 4.9 DHCP
- 4.10 USB Settings
- 4.11 NAT
- 4.12 Forwarding
- 4.13 Security
- 4.14 Parental Control
- 4.15 Access Control
- 4.16 Advanced Routing
- 4.17 Bandwidth Control
- 4.18 IP & MAC Binding
- 4.19 Dynamic DNS
- 4.20 IPv6 Support
- 4.21 System Tools
- 4.22 Logout
- Appendix A: FAQ
- Appendix B: Configuring the PC
- Appendix C: Specifications
- Appendix D: Glossary
- Archer C7_User Manual

Archer C7
AC1750 Wireless Dual Band Gigabit Router
- 37 -
Key type - This option should be chosen according to the AP's security configuration. It
is recommended that the security type is the same as your AP's security type
WEP Index - This option should be chosen if the key type is WEP(ASCII) or WEP(HEX).
It indicates the index of the WEP key.
Auth Type - This option should be chosen if the key type is WEP(ASCII) or WEP(HEX).
It indicates the authorization type of the Root AP.
Password - If the AP your router is going to connect needs password, you need to fill
the password in this blank.
4.6.2 WPS
Choose menu “Wireless 2.4GHz
→ WPS”, you can the screen as shown in Figure 4-18. This
section will guide you to add a new wireless device to an existing network quickly by WPS (Wi-Fi
Protected Setup) function.
Figure 4-18 WPS
WPS Status - Enable or disable the WPS function here.
Current PIN - The current value of the router's PIN is displayed here. The default PIN of the
router can be found in the label or User Guide.
Restore PIN - Restore the PIN of the router to its default.
Gen New PIN - Click this button, and then you can get a new random value for the router's
PIN. You can ensure the network security by generating a new PIN.
Disable Router’s PIN - If this box is checked, and then wireless clients will not be able to
connect to the wireless network with PIN code.
Add device - You can add a new device to the existing network manually by clicking this
button.
If the wireless adapter supports Wi-Fi Protected Setup (WPS), you can establish a wireless
connection between wireless adapter and router using either Push Button Configuration (PBC)
method or PIN method.
Note: