
User's Manual
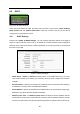
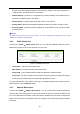
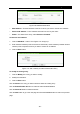

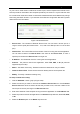
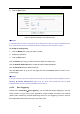
Table Of Contents
- 组合 2
- Archer C7_User Manual
- Package Contents
- Chapter 1. Introduction
- Chapter 2. Connecting the Router
- Chapter 3. Quick Installation Guide
- Chapter 4. Configuring the Router
- 4.1 Login
- 4.2 Status
- 4.3 Quick Setup
- 4.4 Network
- 4.5 Dual Band Selection
- 4.6 Wireless 2.4GHz
- 4.7 Wireless 5GHz
- 4.8 Guest Network
- 4.9 DHCP
- 4.10 USB Settings
- 4.11 NAT
- 4.12 Forwarding
- 4.13 Security
- 4.14 Parental Control
- 4.15 Access Control
- 4.16 Advanced Routing
- 4.17 Bandwidth Control
- 4.18 IP & MAC Binding
- 4.19 Dynamic DNS
- 4.20 IPv6 Support
- 4.21 System Tools
- 4.22 Logout
- Appendix A: FAQ
- Appendix B: Configuring the PC
- Appendix C: Specifications
- Appendix D: Glossary
- C7
- 95
- Archer C7_User Manual
- Package Contents
- Chapter 1. Introduction
- Chapter 2. Connecting the Router
- Chapter 3. Quick Installation Guide
- Chapter 4. Configuring the Router
- 4.1 Login
- 4.2 Status
- 4.3 Quick Setup
- 4.4 Network
- 4.5 Dual Band Selection
- 4.6 Wireless 2.4GHz
- 4.7 Wireless 5GHz
- 4.8 Guest Network
- 4.9 DHCP
- 4.10 USB Settings
- 4.11 NAT
- 4.12 Forwarding
- 4.13 Security
- 4.14 Parental Control
- 4.15 Access Control
- 4.16 Advanced Routing
- 4.17 Bandwidth Control
- 4.18 IP & MAC Binding
- 4.19 Dynamic DNS
- 4.20 IPv6 Support
- 4.21 System Tools
- 4.22 Logout
- Appendix A: FAQ
- Appendix B: Configuring the PC
- Appendix C: Specifications
- Appendix D: Glossary
- Archer C7_User Manual
- 95
- 组合 2
- Archer C7_User Manual
- Package Contents
- Chapter 1. Introduction
- Chapter 2. Connecting the Router
- Chapter 3. Quick Installation Guide
- Chapter 4. Configuring the Router
- 4.1 Login
- 4.2 Status
- 4.3 Quick Setup
- 4.4 Network
- 4.5 Dual Band Selection
- 4.6 Wireless 2.4GHz
- 4.7 Wireless 5GHz
- 4.8 Guest Network
- 4.9 DHCP
- 4.10 USB Settings
- 4.11 NAT
- 4.12 Forwarding
- 4.13 Security
- 4.14 Parental Control
- 4.15 Access Control
- 4.16 Advanced Routing
- 4.17 Bandwidth Control
- 4.18 IP & MAC Binding
- 4.19 Dynamic DNS
- 4.20 IPv6 Support
- 4.21 System Tools
- 4.22 Logout
- Appendix A: FAQ
- Appendix B: Configuring the PC
- Appendix C: Specifications
- Appendix D: Glossary
- C7
- 95
- Archer C7_User Manual
- Package Contents
- Chapter 1. Introduction
- Chapter 2. Connecting the Router
- Chapter 3. Quick Installation Guide
- Chapter 4. Configuring the Router
- 4.1 Login
- 4.2 Status
- 4.3 Quick Setup
- 4.4 Network
- 4.5 Dual Band Selection
- 4.6 Wireless 2.4GHz
- 4.7 Wireless 5GHz
- 4.8 Guest Network
- 4.9 DHCP
- 4.10 USB Settings
- 4.11 NAT
- 4.12 Forwarding
- 4.13 Security
- 4.14 Parental Control
- 4.15 Access Control
- 4.16 Advanced Routing
- 4.17 Bandwidth Control
- 4.18 IP & MAC Binding
- 4.19 Dynamic DNS
- 4.20 IPv6 Support
- 4.21 System Tools
- 4.22 Logout
- Appendix A: FAQ
- Appendix B: Configuring the PC
- Appendix C: Specifications
- Appendix D: Glossary
- Archer C7_User Manual

Archer C7
AC1750 Wireless Dual Band Gigabit Router
- 64 -
4.10.2 Folder Sharing
Choose menu “USB Settings
→Folder Sharing”, you can create an FTP server that can be
accessed from the Internet or your local network.
Figure 4-54 FTP Server Configuration
Sharing Account
Use Login Account - You can use the login account or create a new one. The username
and the password are the same as that of the login account. When choosing Use Login
Account as shared account, the text boxes below cannot be edited.
Use Following Account - You can create a new username and password.
Username - Type the username that you want to give access to the USB drive. The
username must be composed of alphanumeric symbols not exceeding 15 characters
in length.
Password - Enter the password in the Password field. The password must be
composed of alphanumeric symbols not exceeding 15 characters in length. For
security purposes, the password for each user account is not displayed.
Confirm Password - Re-enter the password here.
Sharing Settings
Network/Media Server Name - Name of the USB drive connected to the router. Please
note that the network connection is enabled by default.
Enable - The Access Method is active if the Enable box is selected.