
User's Manual
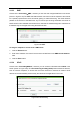
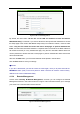
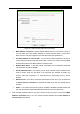
Table Of Contents
- 组合 2
- Archer C7_User Manual
- Package Contents
- Chapter 1. Introduction
- Chapter 2. Connecting the Router
- Chapter 3. Quick Installation Guide
- Chapter 4. Configuring the Router
- 4.1 Login
- 4.2 Status
- 4.3 Quick Setup
- 4.4 Network
- 4.5 Dual Band Selection
- 4.6 Wireless 2.4GHz
- 4.7 Wireless 5GHz
- 4.8 Guest Network
- 4.9 DHCP
- 4.10 USB Settings
- 4.11 NAT
- 4.12 Forwarding
- 4.13 Security
- 4.14 Parental Control
- 4.15 Access Control
- 4.16 Advanced Routing
- 4.17 Bandwidth Control
- 4.18 IP & MAC Binding
- 4.19 Dynamic DNS
- 4.20 IPv6 Support
- 4.21 System Tools
- 4.22 Logout
- Appendix A: FAQ
- Appendix B: Configuring the PC
- Appendix C: Specifications
- Appendix D: Glossary
- C7
- 95
- Archer C7_User Manual
- Package Contents
- Chapter 1. Introduction
- Chapter 2. Connecting the Router
- Chapter 3. Quick Installation Guide
- Chapter 4. Configuring the Router
- 4.1 Login
- 4.2 Status
- 4.3 Quick Setup
- 4.4 Network
- 4.5 Dual Band Selection
- 4.6 Wireless 2.4GHz
- 4.7 Wireless 5GHz
- 4.8 Guest Network
- 4.9 DHCP
- 4.10 USB Settings
- 4.11 NAT
- 4.12 Forwarding
- 4.13 Security
- 4.14 Parental Control
- 4.15 Access Control
- 4.16 Advanced Routing
- 4.17 Bandwidth Control
- 4.18 IP & MAC Binding
- 4.19 Dynamic DNS
- 4.20 IPv6 Support
- 4.21 System Tools
- 4.22 Logout
- Appendix A: FAQ
- Appendix B: Configuring the PC
- Appendix C: Specifications
- Appendix D: Glossary
- Archer C7_User Manual
- 95
- 组合 2
- Archer C7_User Manual
- Package Contents
- Chapter 1. Introduction
- Chapter 2. Connecting the Router
- Chapter 3. Quick Installation Guide
- Chapter 4. Configuring the Router
- 4.1 Login
- 4.2 Status
- 4.3 Quick Setup
- 4.4 Network
- 4.5 Dual Band Selection
- 4.6 Wireless 2.4GHz
- 4.7 Wireless 5GHz
- 4.8 Guest Network
- 4.9 DHCP
- 4.10 USB Settings
- 4.11 NAT
- 4.12 Forwarding
- 4.13 Security
- 4.14 Parental Control
- 4.15 Access Control
- 4.16 Advanced Routing
- 4.17 Bandwidth Control
- 4.18 IP & MAC Binding
- 4.19 Dynamic DNS
- 4.20 IPv6 Support
- 4.21 System Tools
- 4.22 Logout
- Appendix A: FAQ
- Appendix B: Configuring the PC
- Appendix C: Specifications
- Appendix D: Glossary
- C7
- 95
- Archer C7_User Manual
- Package Contents
- Chapter 1. Introduction
- Chapter 2. Connecting the Router
- Chapter 3. Quick Installation Guide
- Chapter 4. Configuring the Router
- 4.1 Login
- 4.2 Status
- 4.3 Quick Setup
- 4.4 Network
- 4.5 Dual Band Selection
- 4.6 Wireless 2.4GHz
- 4.7 Wireless 5GHz
- 4.8 Guest Network
- 4.9 DHCP
- 4.10 USB Settings
- 4.11 NAT
- 4.12 Forwarding
- 4.13 Security
- 4.14 Parental Control
- 4.15 Access Control
- 4.16 Advanced Routing
- 4.17 Bandwidth Control
- 4.18 IP & MAC Binding
- 4.19 Dynamic DNS
- 4.20 IPv6 Support
- 4.21 System Tools
- 4.22 Logout
- Appendix A: FAQ
- Appendix B: Configuring the PC
- Appendix C: Specifications
- Appendix D: Glossary
- Archer C7_User Manual

Archer C7
AC1750 Wireless Dual Band Gigabit Router
- 79 -
Figure 4-71 Add or Modify Parental Control Entry
• MAC Address of Child PC - Enter the MAC address of the PC you want to control, or
you can make use of the All MAC Address In Current LAN item below. If you leave it
blank, then the rule will be applied to all of the PCs except the parental PC.
• ALL MAC Address In Current LAN - You can see the MAC addresses of all PCs in
current LAN by clicking on the drop-down button. Choose one of them, then this MAC
address will be filled to the MAC Address of Child PC field.
• Website Description - In this field, create a description for the website(s). Note that
this description should be unique.
• Allowed Domain Name - In this field, you can enter 8 domain names allowed for the
child to access, either the full name or the keywords (for example TP-LINK). Any
domain name with keywords in it (www.tp-link.com, www.tp-link.com.cn) will be
allowed.
• Effective Time - In this field, choose the effective time for the rule or you can make use
of Access Control > Schedule to create the schedule as you like. The default value is
Anytime.
• Status - In this field, there are two options, Enabled or Disabled. Enabled means that
this rule will take effect while Disabled means that this rule won't take effect.
2. Enter the MAC address of the PC (e.g. 00-11-22-33-44-AA) you’d like to control in the MAC
Address of Child PC field, or you can choose the MAC address from the All Address in
Current LAN drop-down list.