
User's Manual
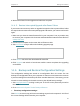

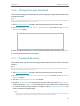
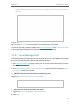
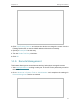
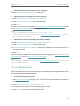
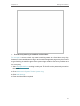
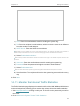
Table Of Contents
- About This Guide
- Get to Know About Your Router
- Connect the Hardware
- Log In to Your Router
- Set Up Internet Connection
- TP-Link Cloud Service
- Guest Network
- USB Settings
- Parental Controls
- QoS
- Network Security
- NAT Forwarding
- VPN Server
- Customize Your Network Settings
- Manage the Router
- 14. 1. Set Up System Time
- 14. 2. Control LEDs
- 14. 3. Test the Network Connectivity
- 14. 4. Upgrade the Firmware
- 14. 5. Backup and Restore Configuration Settings
- 14. 6. Change the Login Password
- 14. 7. Password Recovery
- 14. 8. Local Management
- 14. 9. Remote Management
- 14. 10. System Log
- 14. 11. Monitor the Internet Traffic Statistics
- FAQ

90
Chapter 14
Manage the Router
• Generally, Enable Authentication should be selected if the login of the mailbox requires username and
password.
5. Click Save.
You can click Test Email to test whether the configuration is successful.
To recover the login password, please visit http://tplinkwifi.net, click Forgot Password?
on the login page and follow the instructions to set a new password.
14. 8. Local Management
This feature allows you to limit the number of client devices on your LAN from accessing
the router by using the MAC address-based authentication.
1. Visit http://tplinkwifi.net, and log in with your TP-Link ID or the password you set for
the router.
2. Go to Advanced > System Tools > Administration and complete the settings In Local
Management section as needed.
¾ Allow all LAN connected devices to manage the router:
Toggle on Access for All LAN Connected Devices.
¾ Allow specific devices to manage the router:
1. Toggle off Access for All LAN Connected Devices.
2. Click Add.